Cleaning-up Scanned Drawings
In order to be painted and edited with OpenToonz, scanned drawings have to undergo the cleanup process. The process involves autocentering, to align each drawing according to the pegbar holes; line processing, to recognize the drawing outline; image cropping and re-sizing, to make the drawings fit properly the camera.
The process generates a Toonz raster level (TLV format) and the related default palette (TPL format), where the styles used to paint the level will be stored.
Note
If the computer performance slows down during the cleanup process of very high resolution images, try activating the Minimize Raster Memory Fragmentation option in the Files → Preferences… → General dialog (see Optimizing the Memory Usage ).
The Cleanup Settings
The cleanup process can be controlled by using the Cleanup Settings that include Cleanup, Processing and Camera parameters.
Usually settings are defined and checked for one of the level drawings, then applied to the whole animation level. If all of the drawings in the scene have the same characteristics, it is very likely that the same settings can be used for every drawing throughout all of the animation levels.
Tip
To define cleanup settings:
Choose Scan & Cleanup → Cleanup Settings… and use the dialog to control the cleanup process parameters and options.
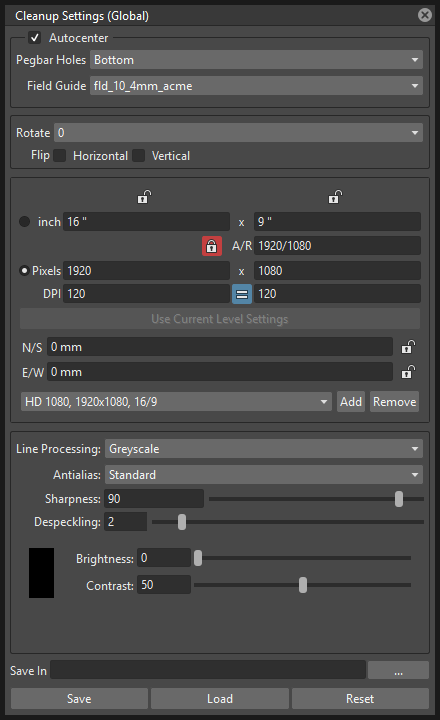
Defining Cleanup Parameters
The Cleanup parameters set the autocentering information and some geometric transformations.
Autocentering
The Autocenter option aligns lineart drawings and full-color images according to the shape and position of the pegbar holes, in order to set the correct registration for them, once they are used in an animation scene.
Pegbar holes have to be included properly during the scanning process in order to be recognized during the process (see Scanning Guidelines for Autocentering ).
In case the autocenter fails because it’s not possible to recognize properly the pegbar holes, an error message is displayed; yet the drawings and images are processed according to the other set parameters.
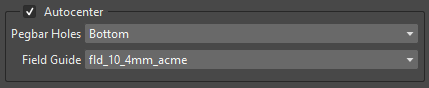
Autocenter parameters are the following:
- Autocenter, when activated, triggers the autocenter process.
- Pegbar Holes, sets the side of the drawing along which holes should be detected.
- Field Guide, specifies the size of the reference field guide that has to be used to set the center of the processed drawings and images, and the type of pegbar holes that have to be detected (such as Acme or Oxbry).
Tip
To check the autocenter on a selected drawing:
- Activate the Autocenter option.
- Set the side where Pegbar Holes have to be detected.
- Set the Field Guide to be used as reference to set the center in the correct place, and to match the shape of the pegbar holes.
- Choose Scan & Cleanup → Preview Cleanup to preview the process in the Viewer.
Other Cleanup Parameters
The Cleanup pane contains also other parameters that can be activated regardless of the autocenter, as they will affect processed images even if the Autocenter option is not activated. Parameters are the following:

- Rotate, rotates the image by 90° steps clockwise. It can be used to set the right orientation for images scanned with a different direction in order to fit the scanner bed.
- Flip, mirrors the image horizontally, vertically or both, according to the activated options. It can be used, for example, when processing a shadow level drawn on the other side of the paper where the character level is drawn, in order to match the two animation levels later.

- Save In, lets you define the folder where the cleaned up drawings are saved. By default it is set to the +drawings default folder of the current project (see Project Default Folders ).
Defining Line Processing Parameters
The Processing parameters set the line processing options in order to prepare drawings for the painting process, recognizing black lines (in black and white or grayscale lineart drawings), or colored lines (in colored lineart drawings).
Tip
To set the type of line processing:
Set the Line Processing option to None, if no line processing is required, Greyscale, if lines have to be recognized as black, or Color, if lines have to be recognized as colored ones.
Processing Black and White or Greyscale Lineart Drawings
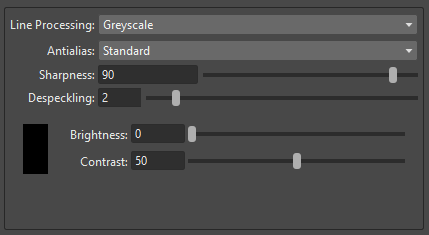
For black and white or greyscale lineart drawings, a set of parameters are available to calibrate the black line recognition process.
The result of the process can be previewed in the OpenToonz main Viewer (see Previewing the Cleanup Process ).
Parameters are the following:
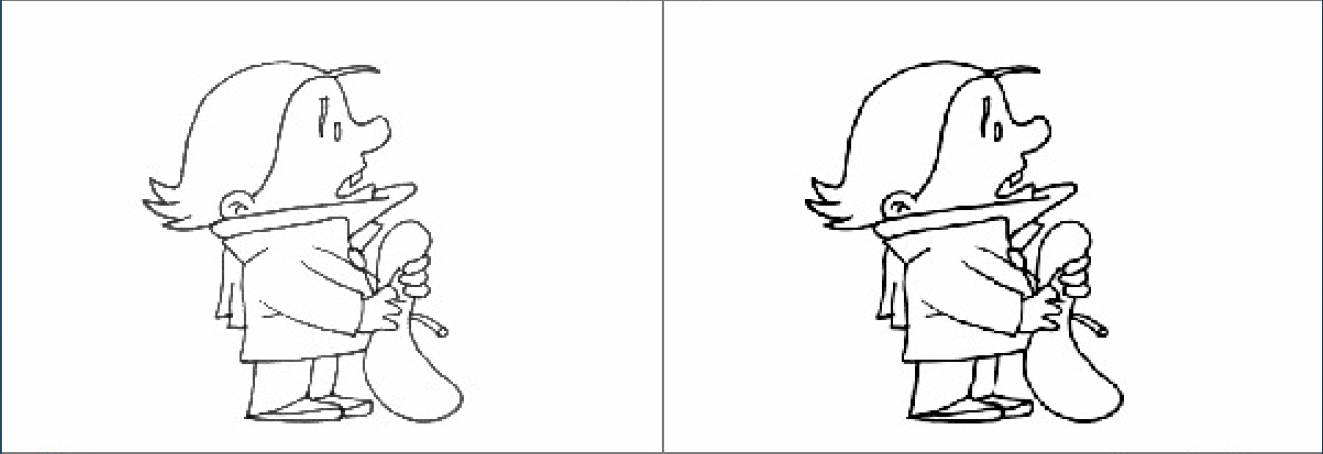
Antialias:, can be set to Standard, None or Morphological. Use Standard to keep the antialias resulting from current camera and defined settings. Use None to eliminate the antialiasing from the processed line, so that the resulting line will be fully solid with no semi-transparent pixels that smooths its edges. Use Morphological to replace the standard antialias with one obtained by analyzing the image edges.
Autoadjust, corrects the levels of grey in the drawings in order to avoid darker and lighter drawings in a sequence (see Autoadjusting Greyscale Lineart Drawings ). (NOTE: This feature is currently not available in OpenToonz).
Sharpness:, defines how sharp the processed lines will be. Higher values produce sharper, harder lines, and lower values create smoother lines.
Despeckling:, removes small spots or marks from the processed images. Its value expresses the size in pixels of the side of the maximum area that has to be removed. The spots and marks removed by this option can also be checked by activating the Opacity Check (see Using the Opacity Check ).
MLAA Intensity:, sets the intensity of the morphological antialias. The higher the value the more blurred the line. (It is available only when Morphological is selected).
Brightness:, controls the thickness of the recognized line: the lower the value, the thicker the line.
Contrast:, controls the antialiasing of the recognized line: a higher value produces more solid pixels, a lower value lines with more antialiased pixels. The amount of antialiasing can also be checked by activating the Opacity Check (see Using the Opacity Check ).
Note
If the Antialias is set on None or Morphological, the Contrast: parameter will become deactivated.
Tip
To set the line processing for black and white or greyscale lineart drawings:
- Activate the Line Processing → Greyscale option.
- Define the parameters according to your needs.
- Preview the result of the cleanup process (see Previewing the Cleanup Process ).
Autoadjusting Greyscale Lineart Drawings
Note
The Autoadjust clean-up options explained here are currently unavailable in OpenToonz. There is no certainty about its reinclusion at a later version or not. If you judge them to be useful for your workflow, you could file an Issue about that in the OpenToonz’ GitHub repository or in the various OpenToonz forums.
The Autoadjust option available among the Cleanup parameters allows you to even the differences between drawings made by key animators and those made by in-betweeners by adjusting the line darkness of all of the level drawings.
Note
The Autoadjust option has effect only on drawings scanned in greyscale mode, while it has no effect on drawings scanned in black and white.
Three different autoadjust algorithms are available:
- Black Eq, computes the average of the darkest grey tone found in drawing lines below a certain threshold and sets this value to the conventional black level, so that grey levels of each image are automatically adjusted.
- Histogram, makes a histogram of the grey levels of the first image and equalizes the histograms of the following images according to it. It works well when the content of the images (apart from line darkness) does not vary too much across the level.
- Histo-L, takes into account the number of lines in each image to normalize the histogram of grey levels, before the histogram equalization is performed. This is useful for example when a character becomes bigger or smaller in an animated level, or when parts of the character are animated independently in some frames.
Note
The advantage of the Histo-L mode over the others is that it adjusts the grey levels of each image independently, while the other algorithms equalize each image to make it look like the first one of the level.
Only the effects of the Black Eq process can be checked using the Scan & Cleanup → Cleanup Preview command; the effects of Histogram and Histo-L are only visible selecting a sequence of at least two frames (i.e. one as reference frame and the others to be auto-adjusted) and processing them using the Scan & Cleanup → Cleanup command. You may need to make a few trials using different algorithms before obtaining the desired results.
Note
These algorithms work on the area of the drawing specified in the Field text boxes, excluding a 5 mm boundary edge. In this way any line might be drawn to delimit the camera shot on paper, and the pegbar holes, do not affect the result.
Processing Colored Lineart Drawings
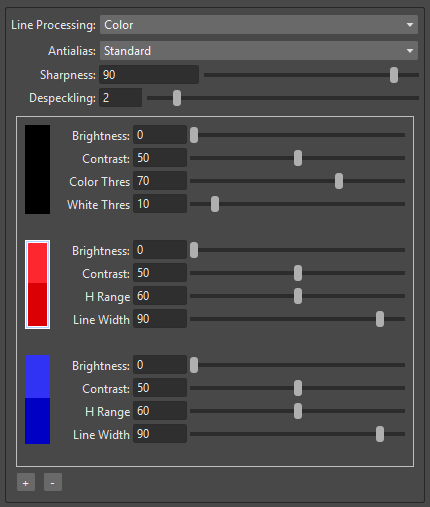
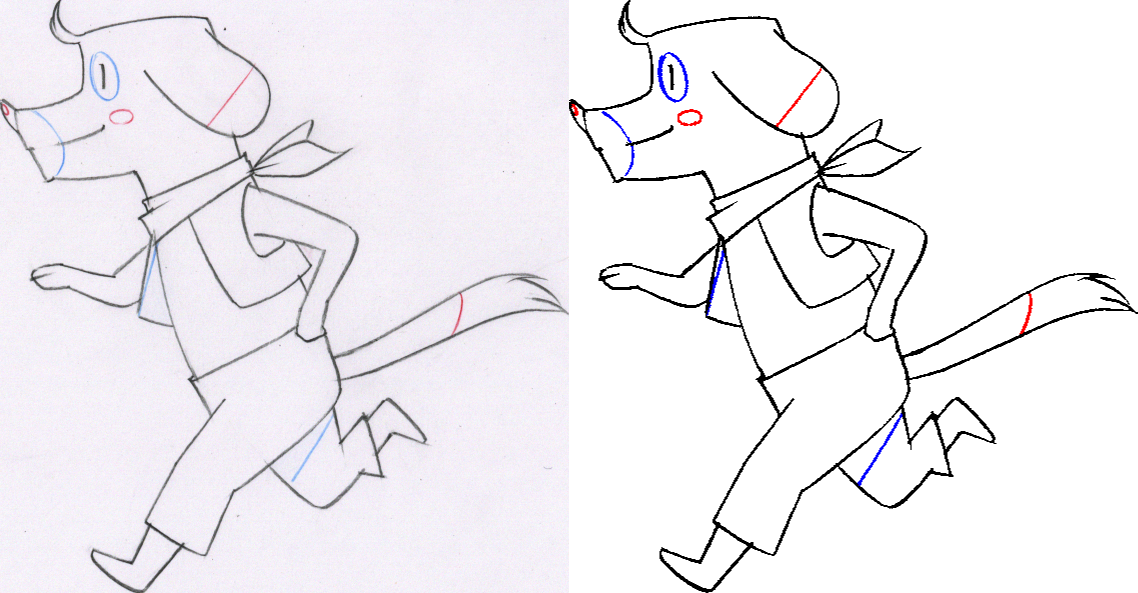
For colored lineart drawings, a set of parameters are available to calibrate the line recognition process, and to set which and how colors have to be detected in the drawings (see Defining Colors for the Color Line Processing ).
For all the cleanup colors you can define a color to be assigned automatically to the lines after the processing, with no need to paint them. The two colors, the one used for the recognition and the one to be assigned to the recognized lines, are available at the bottom area of the Style Editor pane.
Different parameters are available for the black color, that usually defines the main outline in lineart drawings, and for the additional colors, that usually defines special outlines for areas such as shadows and highlights.
The result of the process can be previewed in the OpenToonz main Viewer (see Previewing the Cleanup Process ).
General parameters are the following:
Antialias:, can be set to Standard, None or Morphological. Use Standard to keep the antialias resulting from current camera and defined settings. Use None to remove the antialiasing from the processed line, so that the resulting line will be fully solid with no semi-transparent pixels smoothing its edges. Use Morphological to replace the standard antialias with the one obtained by analyzing the image edges.
Note
If the Antialias is set to None or Morphological, the Contrast parameter will become desactivated.
Sharpness:, defines how sharp the processed lines will be. Higher values produce sharper, harder lines, and lower values create smoother lines.
Despeckling:, removes small spots or marks from the processed images. Its value expresses the size in pixels of the side of the maximum area that has to be removed. The spots and marks removed by this option can also be checked by activating the Opacity Check (see Using the Opacity Check ).
MLAA Intensity:, sets the intensity of the morphological antialias. The higher the value the more blurred the line. (It is available only when Morphological is selected).
In the color list, parameters for the black color are the following:
- Brightness:, controls the thickness of the recognized line: the lower the value, the thicker the line.
- Contrast:, controls the antialiasing of the recognized line: a higher value produces more solid pixels, a lower value lines with more antialiased pixels. The amount of antialiasing can also be checked by activating the Opacity Check (see Using the Opacity Check ).
- Color Threshold:, sets pixels that have to be considered as black and those that have to be considered as colors: the higher the value, the higher the number of pixels that will be considered as colored.
- White Threshold:, sets pixels that have to be considered as white, for example to eliminate the paper color: the higher the value, the higher the number of pixels that will be considered as white.
In the color list, parameters for the other colors are the following:
- Brightness:, controls the thickness of the recognized colored line: the lower the value, the thicker the line.
- Contrast:, controls the antialiasing of the recognized colored line: a higher value produces more solid pixels, a lower value lines with more antialiased pixels. The amount of antialiasing can also be checked by activating the Opacity Check (see Using the Opacity Check ).
- H Range:, sets the range of the hue for color recognition: the higher the value, the higher the number of differently colored pixels that will be associated to the defined color.
- Line Width:, sets the width of the recognized colored line: the higher the value, the higher the number of desaturated pixels that will be associated to the defined color, thus increasing the line thickness.
Tip
To set the line processing for colored lineart drawings:
- Activate the Line Processing → Color option.
- Define the general parameters according to your needs.
- Define the colors you want to be detected in the drawings (see Defining Colors for the Color Line Processing ).
- Define the color parameters according to your needs.
- Preview the result of the cleanup process (see Previewing the Cleanup Process ).
Defining Colors for the Color Line Processing
The colors used to recognize and process drawing lines when doing color line processing can be defined by using the style editor or picking color values directly from the drawing you want to process.
It is possible to add colors to the list, or remove them if they are not needed anymore. The maximum number of color you can define is 7 (black included).
Note
The first color of the list, i.e. the black color, cannot be edited or removed.
Tip
To define colors:
- Select the color you want to define in the list available in the Processing parameters.
- Define the color by doing one of the following:
- Use the Style Editor (see Editing Styles ).
- Use the RGB Picker tool (
 ) to pick the value of the line color from the drawings visible in the Viewer (see Plain Colors ).
Tip
To define colors to be assigned to lines after cleanup processing:
- Select the color for which you want to define the post-process color.
- At the bottom of the Style Editor select the square on the right of the current color: this is the color to be assigned after the processing is done.
- Edit the color in the Style Editor.
Tip
To add a color in the color list:
Click the + button available under the color list.
Tip
To remove a color from the color list:
- Select the color you want to remove from the list.
- Click the - button available under the color list.
Defining Camera
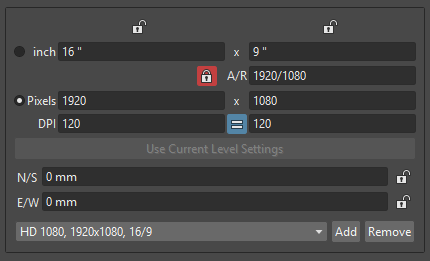
The Camera parameters define the size and resolution of the camera that is used to crop and resize drawings during the cleanup process, in order to prepare and optimize them for the scene.
For example if the cleanup camera is 1920x1080 pixels (HD 1080) with a 16 field size, the cleaned up drawings will be cropped according to the 16 field size and will have the resolution of 1920x1080 pixels.
The cleanup camera definition is similar to the definition of the stage camera (see Defining Camera Settings ). Usually the two cameras have the same parameters, but sometimes you may need to define a cleanup camera that is larger than the stage camera especially if you want drawings border area to overflow the shot.
You can also set other parameters and options:
- The Closest Field parameter (NOT AVAILABLE in OpenToonz) defines the smallest field size you will zoom into the drawing, with the camera when compositing the scene. This value is meaningful if it is smaller than the camera field size, as it increases the final image resolution, preventing zoomed-in images from appearing jagged. For example if the cleanup camera is 1920x1080 pixels (HD 1080) with a 16 field size and the Closest Field is set to 8, the cleaned up drawings will have to be of twice the camera resolution, that is 3840 by 2160 pixels, so that when the camera closes up, the original image pixel resolution is preserved.
- The X and Y offset parameters shift the camera position, in case you want to define for the drawings a center different from the one automatically set by the reference field guide when the Autocenter is on, or different from the actual center of the image if the Autocenter is off; after the cleanup, the camera center will be the new center for the processed drawings.
The cleanup camera size, resolution and offset can also be graphically controlled in OpenToonz’s main Viewer when checking the cleanup process with the Camera Test mode (see Using the Camera Test ).
Saving and Loading Cleanup Settings

Cleanup settings can be saved as CLN files in order to be loaded back and used in a different scene.
They can also be associated specifically to an animation level by saving them in the same location and with the same name of the level: in this way the settings will be automatically displayed when the level is selected, and used every time the level is cleaned up.
Loaded cleanup settings can also become the default settings for the scene or for the project (see Scene Settings and Project Default Settings ).
Tip
To save the cleanup settings:
- Select an empty cell in the Xsheet/Timeline.
- Click the Save Settings button in the bottom bar of the Cleanup Settings window.
- In the browser that opens choose for the CLN file a location and name, and click the Save button.
Tip
To load saved cleanup settings:
- Select an empty cell in the Xsheet/Timeline.
- Click the Load Settings button in the bottom bar of the Cleanup Settings window.
- In the browser that opens retrieve the CLN file you want to load, and click the Load button.
Tip
To save the current cleanup settings for a specific level:
- Select any cell where the level is exposed in the Xsheet/Timeline.
- Click the Save Settings button in the bottom bar of the Cleanup Settings window.
- In the browser that opens save the CLN file in the same location and with the same name as the level, and click the Save button.
Tip
To load cleanup settings for a specific level:
- Select any cell where the level is exposed in the Xsheet/Timeline.
- Click the Load Settings button in the bottom bar of the Cleanup Settings window.
- In the browser that opens retrieve the CLN file you want to load, and click the Load button.
- Click the Save Settings button and in the browser that opens save the CLN file in the same location and with the same name as the level, and click the Save button.
Tip
To reset cleanup settings to the scene default:
Click the Reset Settings button in the bottom bar of the Cleanup Settings window.
Checking the Cleanup Process
While defining the cleanup settings it is possible to preview the full cleanup process, or perform the camera test only, in order to check the result before performing the final cleanup.
Previewing the Cleanup Process
The full cleanup process can be checked in the main Viewer.
Previewing the Cleanup Process in the Main Viewer
A cleanup preview can be activated in the main viewer to display the drawing selected in the Xsheet/Timeline as it will be after the real cleanup process according to the defined cleanup settings, displaying at the same time all the other drawings and images exposed in the Xsheet/Timeline at that frame.
If you change any parameter in the cleanup settings, the preview automatically updates to display how the changes affect the process.
Note
The Opacity Check when activated, affects also the cleanup preview in the main Viewer (see below ).
Note
The Preview Cleanup and the Camera Test checks cannot be activated at the same time: when one is activated the other one is automatically deactivated.
Tip
To activate the cleanup preview in the main Viewer:
In the Xsheet/Timeline select the scanned drawing you want to preview, and choose Scan & Cleanup → Preview Cleanup.
Tip
To deactivate the cleanup preview in the main Viewer:
Choose Scan & Cleanup → Preview Cleanup.
Tip
To preview a different drawing:
Select it in the Xsheet/Timeline.
Tip
To exit the preview cleanup mode:
Choose Scan & Cleanup → Preview Cleanup to deactivate it.
Using the Opacity Check
When calibrating the line processing it is important to check the amount of antialiasing along the drawing outline to understand how smooth the result will be, and to check the small spots and marks that are removed from the drawing because of the Despeckling: function (see Defining Line Processing Parameters ).
The Opacity check, when activated, displays fully solid pixels in black, and semi-transparent pixels belonging to the line antialiasing in red; moreover pixels that will be removed because of the Despeckling: function are displayed in green.
The check is visible both in the preview area (NOT AVAILABLE in OpenToonz) of the Cleanup Settings pane, and with the Preview Cleanup mode, in the main Viewer.
Tip
To activate and deactivate the opacity check:
Choose Scan & Cleanup → Opacity Check or press its default shortcut Alt + 1.
Using the Camera Test
The Camera Test can be used to check the cleanup process as concerning the Cleanup and the Camera parameters. It displays the drawing selected in the Xsheet/Timeline directly in the Viewer without line processing but with the position modified according to the Cleanup parameters (Autocenter, Rotate and Flip), and the size modified according to the Camera parameters. In particular a red box displays how the cleanup camera will crop the drawing, and a blue box displays the camera Closest Field.
It is possible to modify the camera box directly in the Viewer thus updating the cleanup camera information visible in the Cleanup Settings dialog (see Defining Camera ).
If you change any of the Cleanup or Camera parameters, the camera test automatically updates to display how the changes affect the process.
Note
The Preview Cleanup and the Camera Test checks cannot be activated at the same time: when one is activated the other one is automatically deactivated.
Tip
To activate the camera test:
In the Xsheet/Timeline select the drawing you want to preview, and choose Scan & Cleanup → Camera Test.
Tip
To deactivate the camera test:
Choose Scan & Cleanup → Camera Test.
Tip
To modify the cleanup camera directly in the Viewer:
Do any of the following:
- Operate the handles on the top and right edges to scale the camera size horizontally or vertically, thus changing the camera A/R as well.
- Operate the handle on the top right corner to scale the camera size while keeping the A/R.
- Activate the DPI Lock in the cleanup camera parameters, and operate the handles to scale also the camera resolution (NOT AVAILABLE in OpenToonz).
- Move the camera box to modify the cleanup camera X and Y offset.
Tip
To perform the camera test on a different drawing:
Select it in the Xsheet/Timeline.
Tip
To exit the camera test mode:
Choose Scan & Cleanup → Camera Test to deactivate it.
Cleaning up Drawings
Once the cleanup settings are defined and the process is checked, it is possible to cleanup all of the drawings of the scene, or a selection of them.
Drawings can be processed directly inside the scene after performing a selection, or they can be processed automatically in batch mode.
In both cases they will be cleaned up according to the Cleanup Settings defined for the scene, unless a specific CLN file was saved for any of the animation levels in the scene.
By default cleaned up drawings are saved in the +drawings directory of the current project (see Project Default Folders ), but you can change the location by using the Save In option available in the cleanup settings dialog.
Cleaned up animation levels are saved as TLV files; the related palettes are saved in the same location and with the same name of the animation levels as TPL files.
It is also possible to automatically create a backup copy of the cleaned up drawings that will be stored in a subfolder named nopaint inside the same location where the cleaned up drawings are saved. In this way it will be possible to retrieve the original drawing in case some mistakes (e.g. a deletion of a drawing section) are made during the painting process.
Tip
To automatically create a backup copy of the cleaned up drawings:
- Choose File → Preferences… → Drawing.
- Activate the Keep Original Cleaned Up Drawings As Backup option.
Tip
To revert to the original cleaned up drawings:
- In the Level Strip select the drawings you want to revert (see Using the Level Strip ).
- Do one of the following:
- Choose Level → Revert to Cleaned Up.
- Right click the selection and choose Replace level → Revert to Cleaned Up from the menu that opens.
Cleaning up Drawings Directly in the Scene
When cleaning up drawings directly in the scene it is possible to perform a selection of drawings and process them with the current cleanup settings. In this case you can also manage the process frame by frame, as you are prompted to choose an action for each drawing of the selection.
You can also select non-consecutive drawings and drawings from different animation levels. Levels will be processed starting from the first selected column/layer, considering only exposed drawings according to their numbering order.
When a drawing is cleaned up, its cell color turns from light blue to green, the color denoting Toonz raster levels (see Working with Xsheet Columns ). If you cleanup partially an animation level, the remaining cells where the level is exposed will have a double color (green and blue), to stress the fact that the level is partially processed.
When drawings belonging to partially processed levels are selected to be cleaned up, you are prompted whether to cleanup selected drawings overwriting the previous cleaned up version, or to add non-cleaned up frames to the existing level, or to delete the existing level and create a new level with the selected drawings only.
If you want you can also revert to the scanned version of the level you cleaned up by using the Level Settings dialog (see Editing Level Settings ).
Note
If you want to create a new TLV level from an already cleaned up level you can selet it and run the cleanup again. A questions pop up will appear and giving you the possibility to set a different name for the new TLV level by adding a suffix.
Tip
To process the selection according to the chosen settings:
- In the Xsheet/Timeline select the drawings you want to process.
- Choose Scan & Cleanup → Cleanup.
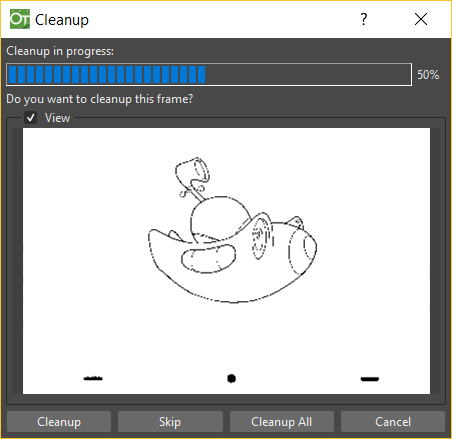
- In the Cleanup dialog for each drawing choose one of the following:
- Cleanup: the current drawing will be cleaned up.
- Skip: the current drawing will not be cleanup up and the dialog displays the next drawing.
- Cleanup All: all the selected drawings will be cleaned up without further prompts.
- Cancel: the cleanup process will be interrupted.
Tip
To revert to the scanned version of a cleaned up level:
- Select any drawing of the cleaned up level.
- Choose Level → Level Settings…
- Copy the Scan Path: information, and paste it in the Path: text field.
Cleaning up Drawings in Batch Mode
The cleanup of drawings exposed in a scene can be added to a task list and performed in batch mode in order to run it in the background while you perform other work on your computer.
Cleanup tasks can be submitted from the OpenToonz browser and can be managed and executed in the Tasks pane, together with render tasks (see for Rendering Scenes in Batch Mode).
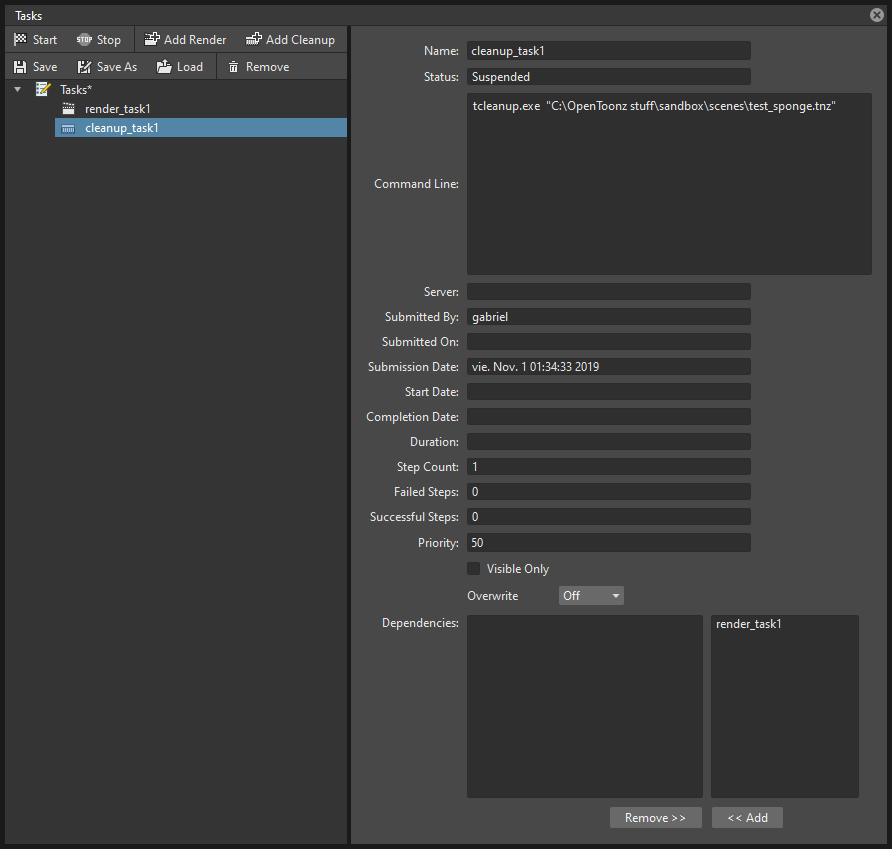
The Tasks pane is divided into two sections: on the left there is the task tree where all of the cleanup tasks are displayed with a brush icon and all of the render tasks with a clapboard icon; on the right there is information about the task selected in the tree.
The Task list can be saved as TNZBAT files and loaded back later in case you want to manage it through different working sessions.
Tip
To save a task list:
- Do one of the following:
- Click the Save Task List (
 ) or the Save Task List As button (
 ) in the bottom bar of the Tasks pane.
 - Right-click the Tasks item at the top of the list and choose Save Task List or the Save Task List As from the menu that opens.
- Use the browser that opens to save the list.
Tip
To load a task list:
- Do one of the following:
- Click the Load Task List button (
 ) in the bottom bar of the Tasks pane.
 - Right-click the Tasks item at the top of the list and choose Load Task List from the menu that opens.
- Use the browser that opens to retrieve and load a previously saved list.
Tip
To resize the tasks pane sections:
Do any of the following:
- Click and drag the separator to resize sections.
- Click and drag the separator toward the window border to hide a section.
- Click and drag the separator collapsed to the window border toward the window center to display again the hidden section.
Managing and Executing Cleanup Tasks
When a cleanup task is selected in the tree, in the section on the right of the Tasks pane task-related properties are displayed, some of which can be edited to configure the task. Properties are the following:
- Name:, displays the tasks name; it can be edited to better identify the task.
- Status:, displays if the task is waiting, running, completed or failed.
- Command Line:, displays the command line related to the task execution with arguments and qualifiers.
- Server:, displays the computer that is running, or will run, the task.
- Submitted By:, displays the user that submitted the task.
- Submitted On:, displays the computer from where the task was submitted.
- Submission Date:, displays when the task was submitted.
- Start Date:, displays when the execution of the task started.
- Completion Date:, displays when the execution of the task was completed.
- Duration:, displays how long the execution lasted.
- Step Count:, displays the number of frames rendered.
- Failed Steps:, displays the number of frames that failed to be rendered.
- Successful Steps:, displays the number of frames successfully rendered.
- Priority:, sets the importance or urgency of the task: tasks with a higher priority will be executed first. This can be edited to change the priority of a task.
- Visible Only, when activated, limits the cleanup process only to columns whose camera stand toggle (
 ) is on, that is to say whose content is visible (see Working with Xsheet Columns).
 - Overwrite, when activated, processes levels even if they are already available in the destination folder, overwriting them.
- Dependencies:, lets you set which of the other submitted tasks have to be successfully completed before starting the current task execution: these tasks can be added from the box on the right where all submitted tasks are displayed.
Task execution can be started and stopped from the task list. If you are using the OpenToonz render farm, render tasks and sub-tasks will be distributed on the farm, one for each computer, so that several tasks can be executed at the same time (see Using the OpenToonz Farm ).
When the tasks are executed, the icon color tells the status of the task according to the following color code:
- Grey, when the task is waiting or is not executed yet.
- Yellow, when the task is being executed.
- Green, when the task was successfully executed.
- Orange, when the task was executed with some errors.
- Red, when the task execution has failed.
Tip
To add scenes to cleanup in the task list:
Do one of the following:
- Click the Add Cleanup Task button (
 ) in the bottom bar of the Tasks pane and use the browser to select a scene file.
 - Select the scenes in the OpenToonz Browser, then right-click any of them and choose Add As Cleanup Task from the menu that opens.
Tip
To configure the cleanup task in the task list:
- Select the cleanup task in the task list.
- Configure it by using the options available on the right of the list.
Tip
To select tasks in the task list:
Do any of the following:
- Click a task to select it.
- Shift-click a task to extend the selection up to that task.
- Ctrl-click (PC) or Cmd-click (Mac) a task to add it to, or remove it from the selection.
Tip
To execute selected tasks:
Do one of the following:
- Click the Start button (
 ) in the bottom bar of the pane.
 - Right-click any selected task icons and choose Start from the menu that opens.
Tip
To stop the execution of selected tasks:
Do one of the following:
- Click the Stop button (
 ) in the bottom bar of the pane.
 - Right-click any selected task icon and choose Stop from the menu that opens.
Tip
To remove selected tasks from the list:
Do one of the following:
- Click the Remove button (
 ) in the bottom bar of the Tasks pane.
 - Right-click any selected task in the list and choose Remove from the menu that opens.
Tip
To add tasks to the Dependencies list:
- Select a task in the list on the right and click the << Add button.
Tip
To remove tasks from the Dependencies list:
- Select a task in the list on the left and click the Remove >> button.