Очистка отсканированных рисунков
Чтобы быть нарисованными и отредактированными с помощью OpenToonz, отсканированные рисунки должны пройти процесс очистки. Процесс включает в себя автоматическое выравнивание, чтобы выровнять каждый рисунок в соответствии с отверстиями pegbar; обработка строк, распознавание контура рисунка; обрезка и изменение размера изображения, чтобы рисунки подходили камере.
В процессе создается уровень растра Toonz (формат TLV) и соответствующая палитра по умолчанию (формат TPL), где будут храниться стили, используемые для рисования уровня.
Примечание
If the computer performance slows down during the cleanup process of very high resolution images, try activating the Minimize Raster Memory Fragmentation option in the Files → Preferences… → General dialog (see Optimizing the Memory Usage ).
Настройки очистки
Процесс очистки можно контролировать с помощью параметров очистки, которые включают настройки очистки, обработки и камеры.
Обычно настройки определяются и проверяются для одного из рисунков уровня, а затем применяются ко всему уровню анимации. Если все рисунки в сцене имеют одинаковые характеристики, весьма вероятно, что для каждого рисунка могут использоваться одни и те же настройки на всех уровнях анимации.
Совет
Чтобы определить настройки очистки:
Choose Scan & Cleanup → Cleanup Settings… and use the dialog to control the cleanup process parameters and options.
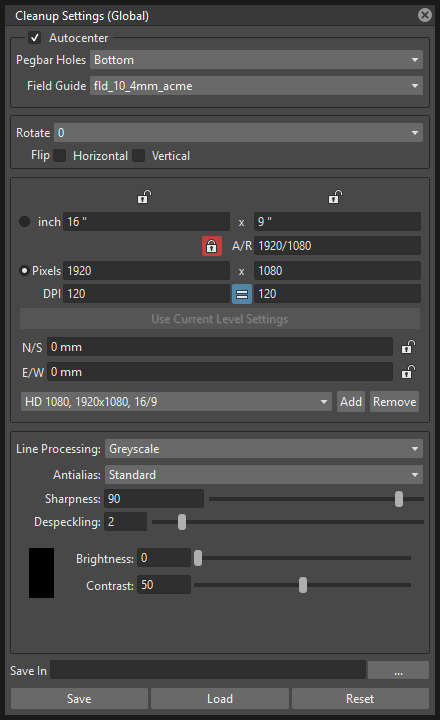
Определение настроек очистки
Настройки очистки устанавливают информацию автоматическое выравнивание и некоторые геометрические преобразования.
Автоматическое выравнивание
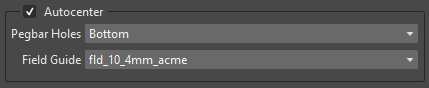
The Autocenter option aligns lineart drawings and full-color images according to the shape and position of the pegbar holes, in order to set the correct registration for them, once they are used in an animation scene.
Отверстия штифтов должны быть правильно включены во время процесса сканирования, чтобы их можно было распознать во время процесса (см. Руководство по сканированию для автоматического выравнивания).
В случае сбоя автоматического выравнивания из-за невозможности правильно распознать отверстия штифтов отображается сообщение об ошибке; все же рисунки и изображения обрабатываются в соответствии с другими заданными параметрами.
Настройки автоматического выравнивания следующие:
- Autocenter, when activated, triggers the autocenter process.
- Pegbar Holes, sets the side of the drawing along which holes should be detected.
- Field Guide, specifies the size of the reference field guide that has to be used to set the center of the processed drawings and images, and the type of pegbar holes that have to be detected (such as Acme or Oxbry).
Совет
Чтобы проверить автоматическое выравнивание на выбранном рисунке:
- Activate the Autocenter option.
- Set the side where Pegbar Holes have to be detected.
- Set the Field Guide to be used as reference to set the center in the correct place, and to match the shape of the pegbar holes.
- Choose Scan & Cleanup → Preview Cleanup to preview the process in the Viewer.
Другие параметры очистки
Панель «Очистка» содержит также другие параметры, которые можно активировать независимо от автоцентра, поскольку они влияют на обработанные изображения, даже если параметр Автоцентр не активирован. Параметры следующие:

- Rotate, rotates the image by 90° steps clockwise. It can be used to set the right orientation for images scanned with a different direction in order to fit the scanner bed.
- Flip, mirrors the image horizontally, vertically or both, according to the activated options. It can be used, for example, when processing a shadow level drawn on the other side of the paper where the character level is drawn, in order to match the two animation levels later.

- Save In, lets you define the folder where the cleaned up drawings are saved. By default it is set to the +drawings default folder of the current project (see Project Default Folders ).
Определение настроек линий обработки
The Processing parameters set the line processing options in order to prepare drawings for the painting process, recognizing black lines (in black and white or grayscale lineart drawings), or colored lines (in colored lineart drawings).
Совет
Чтобы установить тип обработки линий:
Set the Line Processing option to None, if no line processing is required, Greyscale, if lines have to be recognized as black, or Color, if lines have to be recognized as colored ones.
Обработка черно-белых или рисунков в оттенках серого
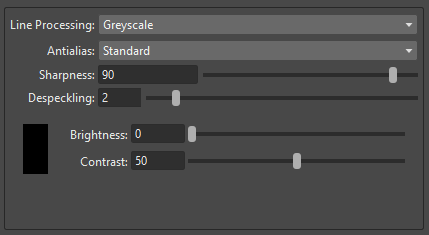
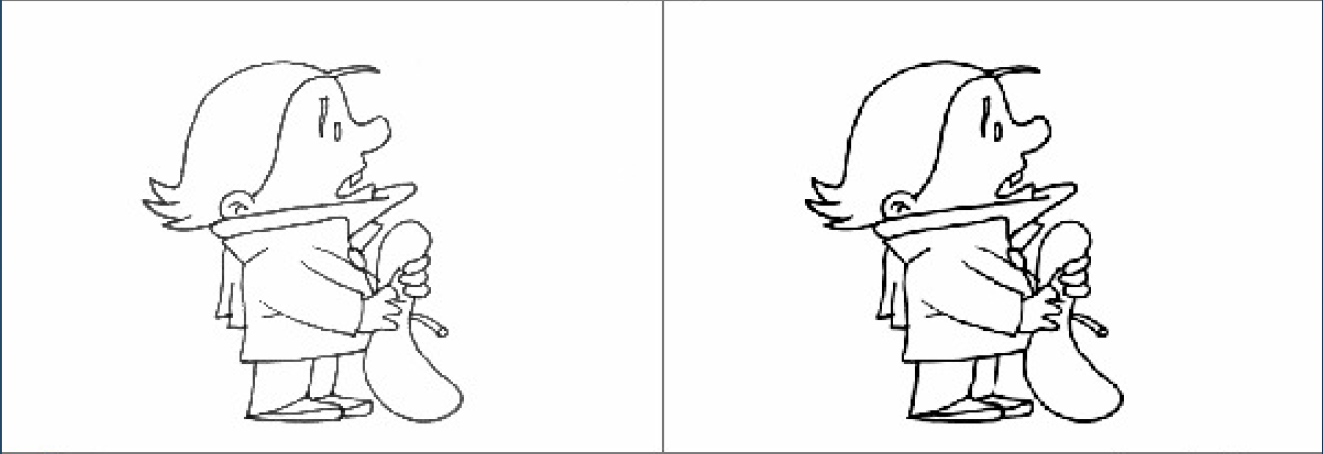
Для черно-белых или в оттенках серого линейных рисунков доступен набор настроек для калибровки процесса распознавания черной линии.
Результат процесса можно предварительно просмотреть в главном просмотрщике OpenToonz (см. Предварительный просмотр процесса очистки).
Параметры следующие:
Antialias:, can be set to Standard, None or Morphological. Use Standard to keep the antialias resulting from current camera and defined settings. Use None to eliminate the antialiasing from the processed line, so that the resulting line will be fully solid with no semi-transparent pixels that smooths its edges. Use Morphological to replace the standard antialias with one obtained by analyzing the image edges.
Autoadjust, corrects the levels of grey in the drawings in order to avoid darker and lighter drawings in a sequence (see Autoadjusting Greyscale Lineart Drawings ). (NOTE: This feature is currently not available in OpenToonz).
Sharpness:, defines how sharp the processed lines will be. Higher values produce sharper, harder lines, and lower values create smoother lines.
Despeckling:, removes small spots or marks from the processed images. Its value expresses the size in pixels of the side of the maximum area that has to be removed. The spots and marks removed by this option can also be checked by activating the Opacity Check (see Using the Opacity Check ).
MLAA Intensity:, sets the intensity of the morphological antialias. The higher the value the more blurred the line. (It is available only when Morphological is selected).
Brightness:, controls the thickness of the recognized line: the lower the value, the thicker the line.
Contrast:, controls the antialiasing of the recognized line: a higher value produces more solid pixels, a lower value lines with more antialiased pixels. The amount of antialiasing can also be checked by activating the Opacity Check (see Using the Opacity Check ).
Примечание
If the Antialias is set on None or Morphological, the Contrast: parameter will become deactivated.
Совет
Чтобы настроить линии обработки для черно-белых или в оттенках серого рисунков:
- Activate the Line Processing → Greyscale option.
- Задайте параметры в соответствии с вашими потребностями.
- Предварительный просмотр результатов процесса очистки (см. Предварительный просмотр процесса очистки).
Автоматическая настройка рисунков в оттенках серого
Примечание
The Autoadjust clean-up options explained here are currently unavailable in OpenToonz. There is no certainty about its reinclusion at a later version or not. If you judge them to be useful for your workflow, you could file an Issue about that in the OpenToonz“ GitHub repository or in the various OpenToonz forums.
The Autoadjust option available among the Cleanup parameters allows you to even the differences between drawings made by key animators and those made by in-betweeners by adjusting the line darkness of all of the level drawings.
Примечание
The Autoadjust option has effect only on drawings scanned in greyscale mode, while it has no effect on drawings scanned in black and white.
Доступны три различных алгоритма автоматической настройки:
- Black Eq, computes the average of the darkest grey tone found in drawing lines below a certain threshold and sets this value to the conventional black level, so that grey levels of each image are automatically adjusted.
- Histogram, makes a histogram of the grey levels of the first image and equalizes the histograms of the following images according to it. It works well when the content of the images (apart from line darkness) does not vary too much across the level.
- Histo-L, takes into account the number of lines in each image to normalize the histogram of grey levels, before the histogram equalization is performed. This is useful for example when a character becomes bigger or smaller in an animated level, or when parts of the character are animated independently in some frames.
Примечание
The advantage of the Histo-L mode over the others is that it adjusts the grey levels of each image independently, while the other algorithms equalize each image to make it look like the first one of the level.
Only the effects of the Black Eq process can be checked using the Scan & Cleanup → Cleanup Preview command; the effects of Histogram and Histo-L are only visible selecting a sequence of at least two frames (i.e. one as reference frame and the others to be auto-adjusted) and processing them using the Scan & Cleanup → Cleanup command. You may need to make a few trials using different algorithms before obtaining the desired results.
Примечание
Эти алгоритмы работают с областью рисунка, указанной в текстовых полях поля, за исключением края границы 5 мм. Таким образом, можно провести любую линию, чтобы ограничить камеру, снятую на бумаге, и отверстия штифтов не влияют на результат.
Обработка цветных линейных чертежей
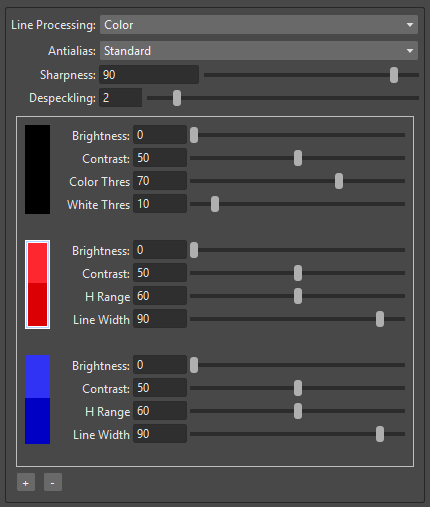
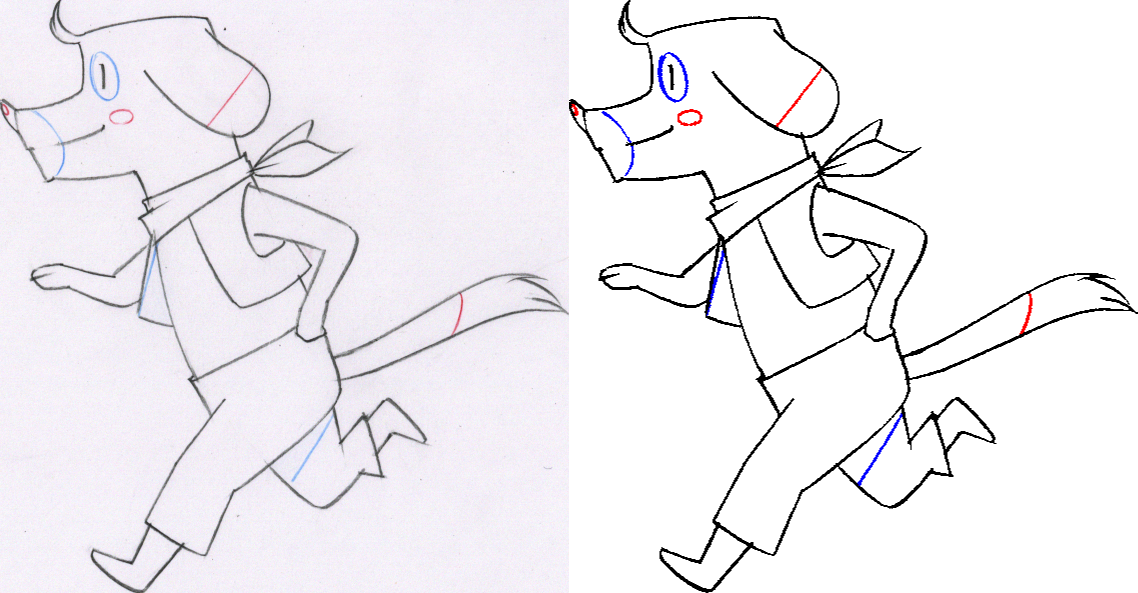
Для цветных линейных рисунков доступен набор параметров для калибровки процесса распознавания линий и для определения того, какие и как цвета должны обнаруживаться на чертежах (см. Определение цветов для обработки цветных линий).
Для всех очищаемых цветов вы можете определить цвет, который будет автоматически назначаться линиям после обработки, без необходимости рисовать их. Два цвета, один из которых используется для распознавания, а другой назначается распознанным линиям, доступны в нижней части панели Редактора стилей.
Различные параметры доступны для черного цвета, который обычно определяет основной контур на линейных чертежах, и для дополнительных цветов, которые обычно определяют специальные контуры для таких областей, как тени и блики.
Результат процесса можно предварительно просмотреть в главном просмотрщике OpenToonz (см. Предварительный просмотр процесса очистки).
Общие параметры следующие:
Antialias:, can be set to Standard, None or Morphological. Use Standard to keep the antialias resulting from current camera and defined settings. Use None to remove the antialiasing from the processed line, so that the resulting line will be fully solid with no semi-transparent pixels smoothing its edges. Use Morphological to replace the standard antialias with the one obtained by analyzing the image edges.
Примечание
If the Antialias is set to None or Morphological, the Contrast parameter will become desactivated.
Sharpness:, defines how sharp the processed lines will be. Higher values produce sharper, harder lines, and lower values create smoother lines.
Despeckling:, removes small spots or marks from the processed images. Its value expresses the size in pixels of the side of the maximum area that has to be removed. The spots and marks removed by this option can also be checked by activating the Opacity Check (see Using the Opacity Check ).
MLAA Intensity:, sets the intensity of the morphological antialias. The higher the value the more blurred the line. (It is available only when Morphological is selected).
В списке цветов параметры для черного цвета следующие:
- Brightness:, controls the thickness of the recognized line: the lower the value, the thicker the line.
- Contrast:, controls the antialiasing of the recognized line: a higher value produces more solid pixels, a lower value lines with more antialiased pixels. The amount of antialiasing can also be checked by activating the Opacity Check (see Using the Opacity Check ).
- Color Threshold:, sets pixels that have to be considered as black and those that have to be considered as colors: the higher the value, the higher the number of pixels that will be considered as colored.
- White Threshold:, sets pixels that have to be considered as white, for example to eliminate the paper color: the higher the value, the higher the number of pixels that will be considered as white.
В списке цветов параметры для других цветов следующие:
- Brightness:, controls the thickness of the recognized colored line: the lower the value, the thicker the line.
- Contrast:, controls the antialiasing of the recognized colored line: a higher value produces more solid pixels, a lower value lines with more antialiased pixels. The amount of antialiasing can also be checked by activating the Opacity Check (see Using the Opacity Check ).
- H Range:, sets the range of the hue for color recognition: the higher the value, the higher the number of differently colored pixels that will be associated to the defined color.
- Line Width:, sets the width of the recognized colored line: the higher the value, the higher the number of desaturated pixels that will be associated to the defined color, thus increasing the line thickness.
Совет
Чтобы настроить обработку линий для цветных чертежей:
- Activate the Line Processing → Color option.
- Определите общие параметры в соответствии с вашими потребностями.
- Определите цвета, которые вы хотите обнаружить на рисунках (см. Определение цветов для цветовой линии обработки).
- Определите параметры цвета в соответствии с вашими потребностями.
- Предварительный просмотр результатов процесса очистки (см. Предварительный просмотр процесса очистки).
Определение цветов для цветной обработки линии
The colors used to recognize and process drawing lines when doing color line processing can be defined by using the style editor or picking color values directly from the drawing you want to process.
It is possible to add colors to the list, or remove them if they are not needed anymore. The maximum number of color you can define is 7 (black included).
Примечание
Первый цвет списка, то есть черный цвет, не может быть отредактирован или удален.
Совет
Чтобы определить цвета:
- Выберите цвет, который вы хотите определить, в списке, доступном в параметрах обработки.
- Определите цвет, выполнив одно из следующих действий:
- Use the Style Editor (see Editing Styles ).
- Use the RGB Picker tool (
 ) to pick the value of the line color from the drawings visible in the Viewer (see Plain Colors ).
Совет
Чтобы определить цвета, которые будут назначены линиям после очистки:
- Выберите цвет, для которого вы хотите определить цвет постобработки.
- В нижней части редактора стилей выберите квадрат справа от текущего цвета: это цвет, который будет назначен после завершения обработки.
- Отредактируйте цвет в редакторе стилей.
Совет
Чтобы добавить цвет в список цветов:
Click the + button available under the color list.
Совет
Чтобы удалить цвет из списка цветов:
- Выберите цвет, который вы хотите удалить из списка.
- Click the - button available under the color list.
Определение камеры
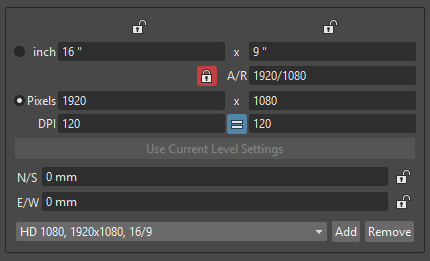
Настройки камеры определяют размер и разрешение камеры, которая используется для обрезки и изменения размера рисунков в процессе очистки, чтобы подготовить и оптимизировать их для сцены.
For example if the cleanup camera is 1920x1080 pixels (HD 1080) with a 16 field size, the cleaned up drawings will be cropped according to the 16 field size and will have the resolution of 1920x1080 pixels.
Определение камеры очистки аналогично определению камеры сцены (см. Определение настроек камеры). Обычно две камеры имеют одинаковые настройки, но иногда вам может потребоваться определить камеру очистки, которая больше, чем сценическая камера, особенно если вы хотите, чтобы область границы рисунков выходила за пределы кадра.
Вы также можете установить другие параметры и опции:
- The Closest Field parameter (NOT AVAILABLE in OpenToonz) defines the smallest field size you will zoom into the drawing, with the camera when compositing the scene. This value is meaningful if it is smaller than the camera field size, as it increases the final image resolution, preventing zoomed-in images from appearing jagged. For example if the cleanup camera is 1920x1080 pixels (HD 1080) with a 16 field size and the Closest Field is set to 8, the cleaned up drawings will have to be of twice the camera resolution, that is 3840 by 2160 pixels, so that when the camera closes up, the original image pixel resolution is preserved.
- The X and Y offset parameters shift the camera position, in case you want to define for the drawings a center different from the one automatically set by the reference field guide when the Autocenter is on, or different from the actual center of the image if the Autocenter is off; after the cleanup, the camera center will be the new center for the processed drawings.
The cleanup camera size, resolution and offset can also be graphically controlled in OpenToonz’s main Viewer when checking the cleanup process with the Camera Test mode (see Using the Camera Test ).
Сохранение и загрузка настроек очистки

Cleanup settings can be saved as CLN files in order to be loaded back and used in a different scene.
Они также могут быть связаны конкретно с уровнем анимации, сохраняя их в том же месте и с тем же именем уровня: таким образом, настройки будут автоматически отображаться при выборе уровня и использоваться каждый раз при очистке уровня.
Загруженные параметры очистки также могут стать настройками по умолчанию для сцены или проекта (см. Настройки сцены и Настройки проекта по умолчанию).
Совет
Чтобы сохранить настройки очистки:
- Select an empty cell in the Xsheet/Timeline.
- Click the Save Settings button in the bottom bar of the Cleanup Settings window.
- In the browser that opens choose for the CLN file a location and name, and click the Save button.
Совет
Чтобы загрузить сохраненные настройки очистки:
- Select an empty cell in the Xsheet/Timeline.
- Click the Load Settings button in the bottom bar of the Cleanup Settings window.
- In the browser that opens retrieve the CLN file you want to load, and click the Load button.
Совет
Чтобы сохранить текущие настройки очистки для определенного уровня:
- Select any cell where the level is exposed in the Xsheet/Timeline.
- Click the Save Settings button in the bottom bar of the Cleanup Settings window.
- In the browser that opens save the CLN file in the same location and with the same name as the level, and click the Save button.
Совет
Чтобы загрузить настройки очистки для определенного уровня:
- Select any cell where the level is exposed in the Xsheet/Timeline.
- Click the Load Settings button in the bottom bar of the Cleanup Settings window.
- In the browser that opens retrieve the CLN file you want to load, and click the Load button.
- Click the Save Settings button and in the browser that opens save the CLN file in the same location and with the same name as the level, and click the Save button.
Совет
Чтобы восстановить настройки очистки по умолчанию для сцены:
Click the Reset Settings button in the bottom bar of the Cleanup Settings window.
Проверка процесса очистки
При определении параметров очистки можно предварительно просмотреть процесс полной очистки или выполнить только тест камеры, чтобы проверить результат перед выполнением окончательной очистки.
Предварительный просмотр процесса очистки
The full cleanup process can be checked in the main Viewer.
Предварительный просмотр процесса очистки в главном окне просмотра
A cleanup preview can be activated in the main viewer to display the drawing selected in the Xsheet/Timeline as it will be after the real cleanup process according to the defined cleanup settings, displaying at the same time all the other drawings and images exposed in the Xsheet/Timeline at that frame.
Если вы измените какой-либо параметр в настройках очистки, предварительный просмотр автоматически обновится, чтобы показать, как изменения влияют на процесс
Примечание
The Opacity Check when activated, affects also the cleanup preview in the main Viewer (see below ).
Примечание
The Preview Cleanup and the Camera Test checks cannot be activated at the same time: when one is activated the other one is automatically deactivated.
Совет
To activate the cleanup preview in the main Viewer:
In the Xsheet/Timeline select the scanned drawing you want to preview, and choose Scan & Cleanup → Preview Cleanup.
Совет
To deactivate the cleanup preview in the main Viewer:
Choose Scan & Cleanup → Preview Cleanup.
Совет
Для предварительного просмотра другого рисунка:
Select it in the Xsheet/Timeline.
Совет
Чтобы выйти из режима очистки предварительного просмотра:
Choose Scan & Cleanup → Preview Cleanup to deactivate it.
Использование Opacity Check
When calibrating the line processing it is important to check the amount of antialiasing along the drawing outline to understand how smooth the result will be, and to check the small spots and marks that are removed from the drawing because of the Despeckling: function (see Defining Line Processing Parameters ).
The Opacity check, when activated, displays fully solid pixels in black, and semi-transparent pixels belonging to the line antialiasing in red; moreover pixels that will be removed because of the Despeckling: function are displayed in green.
The check is visible both in the preview area (NOT AVAILABLE in OpenToonz) of the Cleanup Settings pane, and with the Preview Cleanup mode, in the main Viewer.
Совет
Чтобы активировать и деактивировать Opacity check:
Choose Scan & Cleanup → Opacity Check or press its default shortcut Alt + 1.
Использование тестирования камеры
The Camera Test can be used to check the cleanup process as concerning the Cleanup and the Camera parameters. It displays the drawing selected in the Xsheet/Timeline directly in the Viewer without line processing but with the position modified according to the Cleanup parameters (Autocenter, Rotate and Flip), and the size modified according to the Camera parameters. In particular a red box displays how the cleanup camera will crop the drawing, and a blue box displays the camera Closest Field.
It is possible to modify the camera box directly in the Viewer thus updating the cleanup camera information visible in the Cleanup Settings dialog (see Defining Camera ).
Если вы измените какой-либо из настроек очистки или камеры, тест камеры автоматически обновится, чтобы показать, как изменения влияют на процесс.
Примечание
The Preview Cleanup and the Camera Test checks cannot be activated at the same time: when one is activated the other one is automatically deactivated.
Совет
Чтобы активировать тестирование камеры:
In the Xsheet/Timeline select the drawing you want to preview, and choose Scan & Cleanup → Camera Test.
Совет
Чтобы отключить тестирование камеры:
Choose Scan & Cleanup → Camera Test.
Совет
To modify the cleanup camera directly in the Viewer:
Выполните любое из следующих действий:
- Operate the handles on the top and right edges to scale the camera size horizontally or vertically, thus changing the camera A/R as well.
- Используйте ручку в верхнем правом углу, чтобы масштабировать размер камеры, сохраняя при этом A/R.
- Activate the DPI Lock in the cleanup camera parameters, and operate the handles to scale also the camera resolution (NOT AVAILABLE in OpenToonz).
- Move the camera box to modify the cleanup camera X and Y offset.
Совет
Чтобы выполнить тест камеры на другом рисунке:
Select it in the Xsheet/Timeline.
Совет
Чтобы выйти из режима тестирования камеры:
Choose Scan & Cleanup → Camera Test to deactivate it.
Очистка рисунков
Как только настройки очистки определены и процесс проверен, можно очистить все чертежи сцены или их выбор.
Рисунки могут быть обработаны непосредственно внутри сцены после выполнения выбора, или они могут быть обработаны автоматически в пакетном режиме.
В обоих случаях они будут очищены в соответствии с настройками очистки, определенными для сцены, если только не был сохранен конкретный файл CLN для любого из уровней анимации в сцене.
By default cleaned up drawings are saved in the +drawings directory of the current project (see Project Default Folders ), but you can change the location by using the Save In option available in the cleanup settings dialog.
Очищенные уровни анимации сохраняются в виде файлов TLV; соответствующие палитры сохраняются в том же месте и с тем же именем уровней анимации, что и файлы TPL.
It is also possible to automatically create a backup copy of the cleaned up drawings that will be stored in a subfolder named nopaint inside the same location where the cleaned up drawings are saved. In this way it will be possible to retrieve the original drawing in case some mistakes (e.g. a deletion of a drawing section) are made during the painting process.
Совет
Для автоматического создания резервной копии очищенных рисунков:
- Choose File → Preferences… → Drawing.
- Activate the Keep Original Cleaned Up Drawings As Backup option.
Совет
Чтобы вернуться к исходным вычищенным рисункам:
- In the Level Strip select the drawings you want to revert (see Using the Level Strip ).
- Выполните одно из следующих действий:
- Choose Level → Revert to Cleaned Up.
- Right click the selection and choose Replace level → Revert to Cleaned Up from the menu that opens.
Очистка рисунков непосредственно в сцене
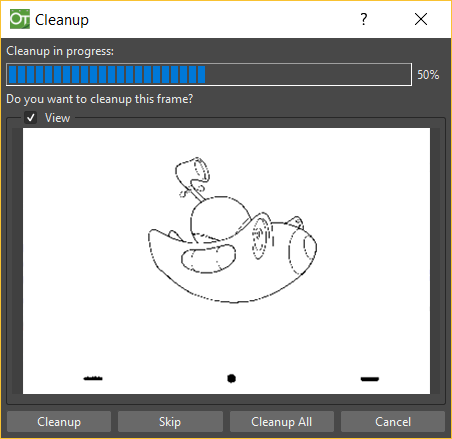
При очистке рисунков непосредственно в сцене можно выполнить выборку рисунков и обработать их с текущими настройками очистки. В этом случае вы также можете управлять процессом покадрово, так как вам предлагается выбрать действие для каждого чертежа выбора.
You can also select non-consecutive drawings and drawings from different animation levels. Levels will be processed starting from the first selected column/layer, considering only exposed drawings according to their numbering order.
When a drawing is cleaned up, its cell color turns from light blue to green, the color denoting Toonz raster levels (see Working with Xsheet Columns ). If you cleanup partially an animation level, the remaining cells where the level is exposed will have a double color (green and blue), to stress the fact that the level is partially processed.
Когда рисунки, принадлежащие к частично обработанным уровням, выбраны для очистки, вам будет предложено очистить выбранные рисунки, перезаписав предыдущую очищенную версию, или добавить неочищенные кадры к существующему уровню, или удалить существующий уровень и создать новый уровень только с выбранными рисунками.
При желании вы также можете вернуться к отсканированной версии очищенного вами уровня с помощью диалогового окна «Настройки уровня» (см. Редактирование настроек уровня).
Примечание
Если вы хотите создать новый уровень TLV из уже очищенного уровня, вы можете выбрать его и снова запустить очистку. Появится всплывающее окно с вопросами, в котором вы сможете задать другое имя для нового уровня TLV, добавив суффикс.
Совет
Для обработки выбора в соответствии с выбранными настройками:
- In the Xsheet/Timeline select the drawings you want to process.
- Choose Scan & Cleanup → Cleanup.
- В диалоговом окне «Очистка» для каждого чертежа выберите один из следующих вариантов:
- Cleanup: the current drawing will be cleaned up.
- Skip: the current drawing will not be cleanup up and the dialog displays the next drawing.
- Cleanup All: all the selected drawings will be cleaned up without further prompts.
- Cancel: the cleanup process will be interrupted.
Совет
Чтобы вернуться к отсканированной версии очищенного уровня:
- Выберите любой рисунок очищенного уровня.
- Choose Level → Level Settings…
- Copy the Scan Path: information, and paste it in the Path: text field.
Очистка рисунков в пакетном режиме
Очистка рисунков, представленных в сцене, может быть добавлена в список задач и выполнена в пакетном режиме, чтобы запускать ее в фоновом режиме, пока вы выполняете другую работу на своем компьютере.
Cleanup tasks can be submitted from the OpenToonz browser and can be managed and executed in the Tasks pane, together with render tasks (see for Rendering Scenes in Batch Mode).
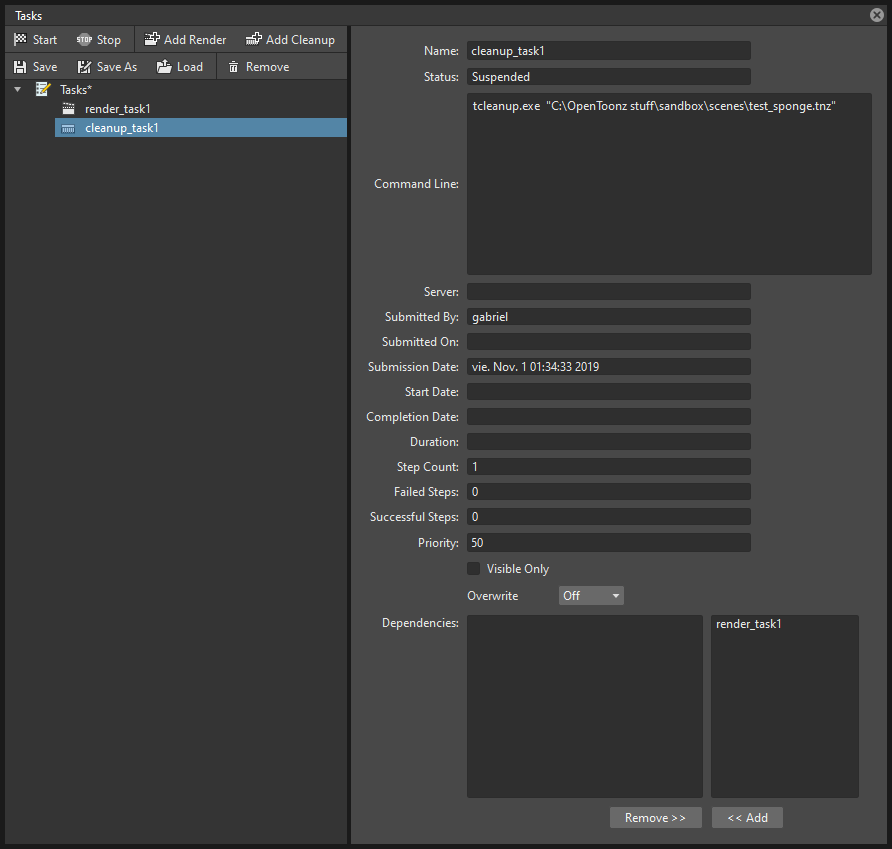
The Tasks pane is divided into two sections: on the left there is the task tree where all of the cleanup tasks are displayed with a brush icon and all of the render tasks with a clapboard icon; on the right there is information about the task selected in the tree.
The Task list can be saved as TNZBAT files and loaded back later in case you want to manage it through different working sessions.
Совет
Чтобы сохранить список задач:
- Выполните одно из следующих действий:
- Click the Save Task List (
 ) or the Save Task List As button (
 ) in the bottom bar of the Tasks pane.
 - Right-click the Tasks item at the top of the list and choose Save Task List or the Save Task List As from the menu that opens.
- Используйте браузер, который открывается, чтобы сохранить список.
Совет
Чтобы загрузить список задач:
- Выполните одно из следующих действий:
- Click the Load Task List button (
 ) in the bottom bar of the Tasks pane.
 - Right-click the Tasks item at the top of the list and choose Load Task List from the menu that opens.
- Используйте браузер, который открывается, чтобы получить и загрузить ранее сохраненный список.
Совет
Чтобы изменить размеры разделов панели задач:
Выполните любое из следующих действий:
- Нажмите и перетащите разделитель, чтобы изменить размеры разделов.
- Щелкните и перетащите разделитель к границе окна, чтобы скрыть раздел.
- Щелкните и перетащите разделитель, свернутый к границе окна, к центру окна, чтобы снова отобразить скрытый раздел.
Управление и выполнение задач очистки
When a cleanup task is selected in the tree, in the section on the right of the Tasks pane task-related properties are displayed, some of which can be edited to configure the task. Properties are the following:
- Name:, displays the tasks name; it can be edited to better identify the task.
- Status:, displays if the task is waiting, running, completed or failed.
- Command Line:, displays the command line related to the task execution with arguments and qualifiers.
- Server:, displays the computer that is running, or will run, the task.
- Submitted By:, displays the user that submitted the task.
- Submitted On:, displays the computer from where the task was submitted.
- Submission Date:, displays when the task was submitted.
- Start Date:, displays when the execution of the task started.
- Completion Date:, displays when the execution of the task was completed.
- Duration:, displays how long the execution lasted.
- Step Count:, displays the number of frames rendered.
- Failed Steps:, displays the number of frames that failed to be rendered.
- Successful Steps:, displays the number of frames successfully rendered.
- Priority:, sets the importance or urgency of the task: tasks with a higher priority will be executed first. This can be edited to change the priority of a task.
- Visible Only, when activated, limits the cleanup process only to columns whose camera stand toggle (
 ) is on, that is to say whose content is visible (see Working with Xsheet Columns).
 - Overwrite, when activated, processes levels even if they are already available in the destination folder, overwriting them.
- Dependencies:, lets you set which of the other submitted tasks have to be successfully completed before starting the current task execution: these tasks can be added from the box on the right where all submitted tasks are displayed.
Выполнение задачи можно запустить и остановить из списка задач. Если вы используете ферму рендера OpenToonz, задачи и подзадачи рендера будут распределены в ферме, по одной для каждого компьютера, чтобы одновременно можно было выполнить несколько задач (см. Использование фермы OpenToonz).
Когда задачи выполняются, цвет значка сообщает о состоянии задачи в соответствии со следующим цветовым кодом:
- Grey, when the task is waiting or is not executed yet.
- Yellow, when the task is being executed.
- Green, when the task was successfully executed.
- Orange, when the task was executed with some errors.
- Red, when the task execution has failed.
Совет
Чтобы добавить сцены для очистки в список задач:
Выполните одно из следующих действий:
- Click the Add Cleanup Task button (
 ) in the bottom bar of the Tasks pane and use the browser to select a scene file.
 - Select the scenes in the OpenToonz Browser, then right-click any of them and choose Add As Cleanup Task from the menu that opens.
Совет
Чтобы настроить задачу очистки в списке задач:
- Выберите задачу очистки в списке задач.
- Настройте его с помощью параметров, доступных в правой части списка.
Совет
Чтобы выбрать задачи в списке задач:
Выполните любое из следующих действий:
- Нажмите на задачу, чтобы выбрать ее.
- Удерживая клавишу Shift, щелкните задачу, чтобы расширить выбор до этой задачи.
- Ctrl-клик (ПК) или Cmd-клик (Mac) задача, чтобы добавить ее или удалить из выбора.
Совет
Для выполнения выбранных задач:
Выполните одно из следующих действий:
- Click the Start button (
 ) in the bottom bar of the pane.
 - Right-click any selected task icons and choose Start from the menu that opens.
Совет
Чтобы остановить выполнение выбранных задач:
Выполните одно из следующих действий:
- Click the Stop button (
 ) in the bottom bar of the pane.
 - Right-click any selected task icon and choose Stop from the menu that opens.
Совет
Чтобы удалить выбранные задачи из списка:
Выполните одно из следующих действий:
- Click the Remove button (
 ) in the bottom bar of the Tasks pane.
 - Right-click any selected task in the list and choose Remove from the menu that opens.
Совет
Чтобы добавить задачи в список зависимостей:
- Select a task in the list on the right and click the << Add button.
Совет
Чтобы удалить задачи из списка зависимостей:
- Select a task in the list on the left and click the Remove >> button.