Previewing and Rendering
In order to generate the final animation, including all the transformations and effects applied to the scene elements, the scene has to be rendered.
It is also possible to preview the animation for performing checks and tune-ups before the full rendering process.
Previewing the Animation
Animations can be previewed directly in the OpenToonz Viewer, including in the Preview mode all the Flipbook features, or by rendering a preview and visualizing it in a separate Flipbook window.
In both cases the Flipbook window tools can be used, and its appearance can be customized (see Using the Flipbook ).
Примечание
If the computer performance worsens during the preview process of raster animation levels, try activating the Minimize Raster Memory Fragmentation option in the Preferences… → General dialog section (see Optimizing the Memory Usage ).
Previewing Frames in the Viewer
In the Viewer it is possible to activate the Preview mode to render the current frame according to the current camera (see Using the Stage Schematic for s).
When changing the current frame, for example by using the playback buttons, it is possible to render other frames of the scene as well. The framebar displays already rendered frames in dark grey, frames that have yet to be rendered in light red, and the current frame, while being rendered in light green and when already rendered in light grey.
For the current camera it is also possible to define a Sub-camera, having an area smaller than the camera frame, inside which the preview will be rendered, and outside which the scene elements will be displayed as they are.
Примечание
To optimize the preview time, only the area visible in the Viewer will be rendered: if you zoom out the viewer the preview will resume to render the new visualized area.
When the Preview mode is activated, every change made in the scene will cause the preview of frames affected by the changes to be recomputed. If, for some reason, the preview fails during the update process, you can regenerate the preview, which will automatically delete previously previewed frames, and compute them again.
Once the frames are previewed, the results can be saved to disk.
The background colors of the preview window, including the colors of the camera background, the window background and the checkerboard visible when transparent images are rendered, are those defined for the Flipbook (see Using the Flipbook ).
Примечание
When previewing frames in the Viewer it is possible to display blank frames after each preview playback, when looping (see Using the Flipbook ), and to limit the range of frames to be considered when playing back the animation by using the Playback Markers (see Using the Playback Markers ).
Примечание
The Camera Box, the Field Guide, the Safe Area and the Guides can be shown or hidden in the Viewer during Preview as well (see Customizing the Viewer ).
Примечание
If the Apply Shrink to Main Viewer option is activated in the Preview Settings dialog, the previewed frames may have a reduced resolution (see Using the Preview Window ).
Совет
To activate and deactivate the preview:
Click the Preview button ( ) in the viewer title bar to activate or deactivate the Preview mode.
Совет
To define a preview Sub-camera for the current camera:
- Activate the Define Sub-camera button (
 ) in the viewer bottom bar.
 - Click and drag in the Viewer to define the box for the Sub-camera area; once the box is defined you can resize it by clicking and dragging its sides and corners, and move it by clicking and dragging inside of it.
Совет
To hide the Sub-camera box:
Deactivate the Define Sub-camera button () in the Viewer bottom bar.
Совет
To activate and deactivate the Sub-camera preview:
Click the Sub-camera Preview button ( ) in the Viewer title bar to activate or deactivate the Sub-camera Preview mode.
Совет
To regenerate the preview:
Right-click in the viewer in Preview mode and choose from the menu that opens one of the following:
- Regenerate Frame Preview to delete and recompute the current frame only.
- Regenerate Preview to delete and recompute the whole previewed frame range.
Совет
To save previewed frames:
- Do one of the following:
- Click the Save Images button (
 ) in the Viewer bottom bar.
 - Right-click in the Viewer, and choose Save Previewed Frames from the menu that opens.
- Use the Browser to choose a name and location for the file to be saved.
Примечание
The saved files format will be the one currently defined in the Output Settings dialog, and the format options used at save time will also be the ones defined by using the Options button there (see Choosing the Output Settings ).
Примечание
The saved files color depth will always be 8 bit, regardless of the options chosen in the Output Settings or Preview Settings dialogs.
Using the Preview Window
The animation can be previewed in a separate window according to specific Preview Settings, that can be different from the Output Settings. In this way the preview can be configured so that it is faster to compute then the final output, for example because it uses a camera with a smaller resolution.
It is possible to define the range of previewed frames both in the Preview Settings and by using the Playback Markers in the Xsheet/Timeline: any change made in one mode is reflected in the other one as well (see Using the Playback Markers ). It is also possible to display blank frames after each preview playback, when looping.
It is possible to activate the Preferences… → Preview → Fit to Flipbook option to ensure that the previewed images fit the size of the preview window, regardless their resolution.
It is possible to clone the Preview window, or to automatically open as many Preview windows as needed by activating the Preferences… → Preview → Display in a New Flipbook Window option, for example to examine or compare specific frames by using the Flipbook tools (see Using the Flipbook ).
Примечание
As when changes are made in the scene all the preview windows automatically update, it is possible to check the animation before and after some editing by freezing any of the Previews.
The Preview window framebar displays rendered frames in grey, frames that have yet to be rendered in light red, and the current frame that is being rendered in light green.
Примечание
To optimize the preview time, only the area visible in the Preview window will be rendered: if you zoom out the Viewer the preview will resume to render the new visualized area.
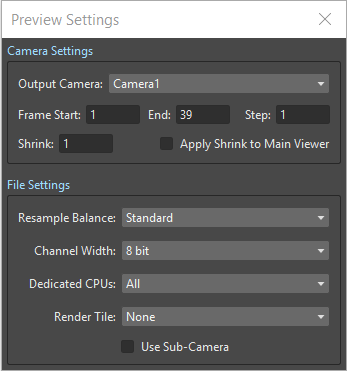
The Preview Settings dialog lets you define the resolution, range, step and shrink of the preview frames. Settings are the following:
Output Camera: sets which camera, among the ones defined in the scene, has to be used to set the resolution and preview the animation.
Frame Start: and End: set the frame range of the scene to preview; by default these values refer to the whole scene length.
Step: sets the step for the rendered sequence; for example if it is two, one frame each two will be rendered.
Shrink: sets the reduction value for the previewed sequence resolution; for example if it is 2, one pixel each two will be rendered, thus resulting in previewed frames having half of the original output camera resolution.
Apply Shrink to Main Viewer if activated uses the shrink value set in the preview settings to the preview mode of the viewer as well (see Previewing Frames in the Viewer ).
Resample Balance: controls the resample that is used when images are scaled or rotated. In scenes where images are strongly resampled, for instance when their size changes dramatically, the final rendering may appear slightly out of focus. By balancing the resample you can give some sharpness back to the rendered frames.
There are several options to choose from. Originally Toonz provided three options: Standard, Improved, High. The higher the balance chosen, the longer the time needed for rendering the output. Additionally, OpenToonz provides several other standard resampling filters that could help improve the final results in a wider range of situations.
Channel Width: sets the color depth for rendered images; choices are 8 bit or 16 bit per color channel.
Dedicated CPUs: sets, in case your computer has multiple CPUs, how many processors will be assigned to the previewing process. Setting the value to All will generate a number of rendering threads equal to the number of processors, thus speeding up the previewing process. However it is suggested to use the Half or Single values if the scene to preview is very complex, because the higher the dedicated CPUs, the more the memory required to perform the preview.
Render Tile: allows the preview of very complex scenes whose frames will be computed in tiles that are automatically stitched to create the final preview: the smaller the size of the tile, the longer the preview process. Setting the value to Medium or Small will allow the preview of very high resolution outputs of very complex scenes, that otherwise may fail to be previewed; setting the value to None may prevent some artifacts that the tile stitching may generate. In most of the cases the Large value will do the work, because it is not slower than the None option, and yet is able to preview complex scenes.
Use Sub-camera, when activated, uses the sub-camera defined for the selected camera in the preview frames (see Previewing Frames in the Viewer ).
Совет
To set the scene preview settings:
- Choose Render → Preview Settings….
- Set the options you want to use for the preview.
Совет
To open the preview window:
Choose Render → Preview.
Совет
To clone the preview window:
Right-click in the Flipbook window and choose Clone Preview from the menu that opens.
Совет
To freeze the preview rendering:
Right-click in the Flipbook window and choose Freeze Preview from the menu that opens.
Совет
To open a new Flipbook window every time you run a preview:
- In File → Preferences… → Preview.
- Activate the Display in a New Flipbook Window option.
Совет
To rewind the preview content automatically after playback:
- In File → Preferences… → Preview.
- Activate the Rewind After Playback option.
Совет
To display blank frames after each preview playback when looping:
- In File → Preferences… → Preview.
- Do any of the following:
- Use Blank Frames option to set how many blank frames you want to be displayed after each preview playback, when looping.
- Use Blank Frames Color option to set the color for the blank frames.
Previewing and Caching Effect Nodes in the Schematic
The Preview window can also be opened from the FX Schematic, to check the compositing result up to a specific node. The behaviour of the FX Schematic Preview window is the same as the standard one (see Using the Preview Window ).
Примечание
In case the Sub-camera is used, the Preview window will fit the Sub-camera area (see Using the Preview Window ).
It is also possible to cache the preview up to a specific node, so that the result of the compositing up to that node is stored in the computer memory and will be reused with no need to recompute it the next time the preview is run.
Of course if something changes in the flow up to the cached node (for example if an object transformation or an effect parameter is changed), the cached preview will be discarded and will be stored again the next time the Preview is run.
Совет
To open a Preview window referring to an FX Schematic node:
Right-click the node and choose Preview from the menu that opens.
Совет
To cache an effect node:
Right-click the node and choose Cache FX from the menu that opens: the effect node will be displayed with a fold at the bottom right corner to highlight that it has been cached.
Совет
To uncache an effect node:
Right-click the node and choose Cache FX from the menu that opens: the cached preview images will be discarded.
Using the Flipbook
The Flipbook is an image viewer where animation levels, images, clips and rendered frames can be displayed. In OpenToonz it is used to display the scene contents in the Viewer, including the Preview mode, and to display the previewed or rendered animations. It is also used to view files and levels from the browser or the Xsheet/Timeline, and to display the loaded Color Model.
Примечание
The Safe Area is the only element that can be shown or hidden in the Flipbook when previewing the animation (see Customizing the Viewer ).
The Flipbook title bar displays the information about the content on the left, and the zoom percentage on the right.
At the bottom a customizable set of buttons is available:
- The Option button (
 ) sets which buttons and elements have to be displayed in the bottom bar.
 - The Save Images button () opens a browser to save the flipbook content.
- The Snapshot (
 ) and Compare to Snapshot (
 ) buttons allow the comparison between different frames of the flipbook content.
 - The Define Sub-camera button () allows the definition of a region, smaller than the size of the loaded image sequence, that will limit the portion of the images that will be displayed in the Flipbook. It may prove useful to speed up the loading time and increase the playback speed, when you are only interested in a certain region of the full camera image.
- The Sub-camera Preview button () lets you activate or deactivate the defined sub-camera region (see above).
- The Background color buttons sets a White (
 ), Black (
 ) or Checkered (
 ) background for transparent images.
 - The framerate slider sets the number of frames per second to be displayed during playback.
- The playback buttons can be used to play the Flipbook content back and set the current frame.
- The Channel buttons display the Red, Green, Blue and Alpha channels of the Flipbook content, both in colors and grey-scale.
- The Histogram button (
 ) opens a window displaying histograms mapping the amount of the darkest and lightest pixels in each channel.
Примечание
If the bottom bar is too short to display all the options, it can be scrolled by using arrow buttons available at its ends.
In an opened Flipbook it is possible to load new contents both replacing the previous animation, or appending the new contents to it. When several Flipbooks are opened, their playback can be linked, so that moving the current frame or playing the contents back in one of them, automatically moves the current frames and plays the contents back in all the other Flipbooks as well.
The colors displayed as background in the flipbook can also be customized so that they can better fit the color scheme of the production.
Совет
To open a Flipbook:
Choose Windows → Flipbook.
Совет
To load some contents into a Flipbook:
Do one of the following:
- Right-click in the Flipbook and choose Load Images from the menu that opens, then use the Browser to retrieve the file you want to load.
- Drag and drop the file you want to load from the OpenToonz file browser to the Flipbook.
Совет
To append some content to the Flipbook content:
Right-click in the Flipbook and choose Append Images from the menu that opens, then use the Browser to retrieve the file you want to append to the current content.
Совет
To navigate the Flipbook content:
Do one of the following:
- Use the zoom shortcut keys (by default + and - keys) to zoom in and zoom out at specific steps (e.g. 50%, 100%, 200%, etc.).
- Use the mouse wheel to zoom in and zoom out.
- Click and drag to define an area you want to zoom to.
- Use the Reset View shortcut (by default the Alt + 0 key), or right-click in the Viewer and choose Reset View from the menu that opens, to display the Flipbook content at its actual size, and centered on the image center.
- Middle-click and drag to scroll in any direction.
Совет
To fit the size of the Flipbook window to its content:
Double-click the Flipbook title bar.
Совет
Windows only - to enter/exit the Flipbook full screen mode:
Right-click the Flipbook and choose Full Screen Mode / Exit Full Screen Mode from the menu that opens.
Совет
To customize the Flipbook bottom bar:
Use the Option button () to choose which buttons and elements have to be displayed: only selected items will be displayed.
Совет
To play the Flipbook content back:
Do one of the following:
- Use the Play button.
- Drag the frame bar cursor.
Совет
To rewind the Flipbook content automatically after playback:
- In File → Preferences… → Preview.
- Activate the Rewind after Playback option.
Совет
To set the current frame:
Do one of the following:
- Use the playback buttons.
- Drag the frame bar cursor.
- Type in the frame bar field the number of the frame you want to view.
Совет
To link the playback of all the open Flipbook windows:
Choose Play → Link Flipbooks to activate or deactivate the linked playback mode.
Совет
To set the playback frame rate:
Use the frame rate slider; by default the framerate is the one set in the Scene Settings dialog (see Setting the Frame Rate ).
Совет
To save the Flipbook content:
- Do one of the following:
- Right-click in the Flipbook and choose Save Images from the menu that opens.
- Click the Save Images button () in the Flipbook bottom bar.
- Use the Browser to choose a name, a format and a location for the file to be saved.
Совет
To take a snapshot of a frame and compare it to another frame:
- Select the frame you want to store and click the Snapshot button () in the Flipbook bottom bar.
- Move to a different frame, or load some different content, and click the Compare to Snapshot button ().
- Click and drag the vertical or horizontal marker to display the taken snapshot under the current frame.
- Click again the Compare to Snapshot button () to exit the compare mode.
Совет
To Define the Loading Box:
- Load in the Flipbook the sequence of images you want to visualize.
- Activate the Define Loading Box button () in the Flipbook bottom bar.
- Click and drag in the image to Define the Loading Box; once the box is defined you can resize it by clicking and dragging its sides and corners, and move it by clicking and dragging inside it.
Совет
To activate and deactivate the Loading Box:
Click the Use Loading Box button () in the Flipbook bottombar to activate or deactivate the loading box.
Совет
To set the Flipbook background color for transparent images:
Click the White Background (), Black Background () or Checkered Background () buttons in the Flipbook bottom bar to activate/deactivate the desired background color.
Примечание
In the Preview window and when the Viewer is in Preview mode the background color will be visible behind the Camera BG Color (see below ).
Совет
To set the image channels to be displayed:
Do one of the following:
- Click the top section of the Red, Green and Blue buttons in the Flipbook bottom bar to display, or hide, the related image channel in colors.
- Click the bottom section of the Red, Green and Blue buttons in the Flipbook bottom bar to display, or hide, the related image channel in grey-scale.
- Click the Alpha Channel button in the Flipbook bottom bar to display, or hide, the image alpha channel.
Примечание
When no channel button is activated the full image is displayed.
Совет
To display the Histograms of the Flipbook content:
- Do one of the following:
- Click the Histogram button () in the Flipbook bottom bar.
- Right-click the Flipbook content and choose Show Histogram from the menu that opens.
- Choose the channel for which you want to see the histogram.
Совет
To define the previewed images background color:
- Choose Xsheet → Scene Settings…
- Set the Camera BG Color by doing one of the following:
- Set the Red, Green and Blue values.
- Click the color thumbnail and use the Style Editor to edit it (see Plain Colors ).
Примечание
This color is relevant only in the Preview window and when the Viewer is in Preview mode.
Совет
To define the Flipbook checkerboard colors:
- Choose Xsheet → Scene Settings…
- Set the Checkerboard Color 1 and Color 2 by doing one of the following:
- Set the Red, Green and Blue values.
- Click the color thumbnail and use the Style Editor to edit it (see Plain Colors ).
Using the Playback Markers
Two markers, Playback Start Marker and Playback End Marker, are available in the frame column of the Xsheet (and the frame row of the Timeline) to define the playback range.
The user can manually set the playback markers to define the starting and ending frames to be considered when playing back the animation, or leave them unset, so OpenToonz automatically defines a playback range that includes all of the Xsheet/Timeline contents.
Примечание
When the playback markers are activated, the frame range in the Preview Settings… dialog changes accordingly (see Using the Preview Window ).
Совет
To set a playback range:
- Set the starting frame by doing one of the following:
- Drag the Playback Start Marker to the desired frame.
- Right-click on the desired frame in the frame column/bar and select Set Start Marker from the menu that shows.
- Set the ending frame by doing one of the following:
- Drag the Playback End Marker to the desired frame.
- Right-click on the desired frame in the frame column and select Set Stop Marker from the menu that shows.
Совет
To set the playback range to match the duration of a block of contiguous exposed cells:
- In the Xsheet/Timeline, select an exposed cell from the desired column/layer.
- Right-click on the desired frame in the frame column and select Set Auto Markers from the menu that shows.
Примечание
There must be an exposed cell in that column/layer at that frame for the Set Auto Markers option to be available.
Примечание
No matter to what block of contiguous exposed cells the selected cell belongs to, this function will take into account the frame in which the user performed the right click operation to set the markers.
Совет
To set a single-frame playback range:
Right-click on the desired frame in the frame column/bar and select Preview This from the menu that shows.
Совет
To unset the playback markers:
Right click on the frame column and select Remove Markers from the menu that shows.
Примечание
When deactivated, playback markers turn grey.
Rendering the Animation
Final animations can be rendered directly by loading the related scene, or in batch mode. In both cases the rendering properties are defined in the Output Settings dialog.
Примечание
Information about the scene name and frame number can be included when needed in rendered frames by activating the Show Info in Rendered Frames option in the Preferences… → General dialog section.
Choosing the Output Settings
The Output Settings dialog lets you define the file format, location and properties for the final rendering. Settings are the following:

Camera Settings
- Output Camera: sets which camera, among the ones defined in the scene, has to be used to render the animation.
- Frame Size sets the frame size of the current camera, also available in the Xsheet → Camera Settings… dialog (see Defining Camera Settings ).
- Frame Start: and End: set the frame range of the scene to render; by default these values refer to the whole scene length.
- Step: sets the step for the rendered sequence; for example if it is 2, one frame each two will be rendered.
- Shrink: sets a reduction value for the defined render resolution; for example if it is 2, one pixel each two will be rendered, thus resulting in frames having half of the original output camera resolution.
File Settings
Save in: is for setting the location where the output is saved; the location can be set by typing or by using the Browser button.
Примечание
If in the Browser you choose any default folder of the active project, in the path field the full path will be replaced by the related default folder alias (see Project Default Folders ).
Name: is the name you want to assign to the output file; by default it’s the name of the scene.
In case the chosen file format produces image sequences, the base name will be assigned to all rendered frames, that will be identified by a progressive four-digits number written between the base name and the file extension, e.g.
animation.0001.tif,animation.0002.tif, etc. These file sequences will be displayed in the OpenToonz File Browser with a double dot before the file extension, e.g.animation..tif, and treated as a single animation level when loaded back into OpenToonz.File Format is the format for the output; natively supported formats are the following: 3GP, AVI, BMP, GIF, JPG, MOV, NOL, PNG, RGB, SGI, Spritesheet, TGA, TIF and TIFF.
Примечание
OpenToonz supports the 3GP and MOV formats by using the 32-bit version of QuickTime.
To save in other popular video formats, like MP4 and WebM, OpenToonz uses FFmpeg (a free software project that produces libraries and programs for handling multimedia data). Once FFmpeg is installed in the system, and configured to work with OpenToonz, MP4 and WebM will be listed along the other standard output file formats. For detailed instructions on how to install and configure FFmpeg, please see Using FFmpeg with OpenToonz .
Примечание
Apart from 3GP, AVI, GIF, MOV, MP4 and WebM, all other formats will output image sequences.
Options button, opens a dialog to set specific properties related to the chosen file format, such as codecs for video files, color depth for TIF images, etc.
Resample Balance: controls the resample that is used when images are scaled or rotated. In scenes where images are strongly resampled, for instance when their size changes dramatically, the final rendering may appear slightly out of focus. By chosing a different resampling algorithm you can give some sharpness back to the rendered frames.
There are several options to choose from. Originally Toonz provided only three options: Standard, Improved, and High. The higher the balance chosen, the longer the time needed for rendering the output. Currently OpenToonz also provides several other standard resampling options that could help improve the final results in a wider range of situations. These include: Triange filter, Mitchell-Netravali filter, Cubic convolution, Hann window, Hamming window, Lanczos window, Gaussian convolution, Closest Pixel and Bilinear.
Channel Width: sets the color depth for rendered images; choices are 8 bit and 16 bit per color channel. If using the 16 bit channel width, be sure to select an output file format supporting it, for example the TIF format with the 64(RGBA) option activated.
Dedicated CPUs: sets, in case your computer has multiple CPUs, how many processor threads will be assigned to the rendering process. Setting the value to All will generate a number of rendering threads equal to the number of processors, thus speeding up the rendering process. However in systems with limited RAM resources, it’s suggested to use the Half or Single options if the scene to render is very complex, because the higher the dedicated CPUs, the more RAM will be required to perform the rendering, leading to potentially longer rendering times or system instability.
Render Tile: allows the rendering of complex scenes, by dividing each frame in a certain number of tiles, which are individually rendered and finally stitched together to create the final output frame: the smaller the size of the tiles, the longer the rendering will take but the less RAM will require. Setting the value to Medium or Small will allow the rendering of very high resolution outputs of very complex scenes, that otherwise may fail to be rendered; setting the value to None may prevent some artifacts that the tile stitching may generate. In most cases the Large value will do the work, because it’s not slower than the None option, and yet is able to render complex scenes.
Other Settings
Add Clapperboard allows to add a Clapperboard. A clapperboard is a static image intended to display information of the scene. It will be added before the rendered frames, in order to record and convey information to subsequent phases of the pipeline.
Примечание
For this option to be enabled you must first choose any video file format from the File Format dropdown menu (i.e. 3GP, AVI, MOV, MP4 or WebM).
Edit Clapperboard… button, opens a dialog for designing the clapperboard and setting its properties. For detailed information on using the Clapperboard feature, please see the Using The Clapperboard section.
Gamma: performs a gamma correction on rendered images before writing them to a file; the value you specify can include decimal fractions.
Dominant Field: allows you to render two images per frame, then keeping only odd lines from one image, and even lines from the other to compose a final frame. This process is called interlacing.
Interlaced images are useful when experiencing a strobe effect due to a fast camera or object movement, as all movement interpolation will be effectively doubled (having one odd-lines image and one even-lines image, instead of just one full progresive frame), thus becoming smoother.
Field rendering is only relevant for scenes that are intended for video output. Options are None (for rendering progresive frames), Even (PAL) and Odd (NTSC) (for chosing which of the rendered interlaced fields is to be shown in first place). Usually you should choose it according to the video standard you are outputting to.
Frame Rate: is the frame rate of the scene, also available in the Xsheet → Scene Settings… dialog (see Setting the Frame Rate ).
Stretch from FPS: To: changes the timing of the Xsheet when outputting files; in this way you can output a number of frames that is independent from the frame rate set in the scene settings.
For example, if you are working at 25 fps, a 150 frames Xsheet will produce 6 seconds of animation. If you need to transfer the frame rate to 30 fps using the same Xsheet, the animation will last 5 seconds (150 frames divided by 30 fps is equal to 5 seconds), and consequently it will be a little bit faster. Stretching from 25 to 30 fps, the output will include an increased number of frames to retain the original time length, and the rendered frames will be 180 (6 seconds multiplied by 30 fps is equal to 180 frames).
When going from a higher frame rate to a lower one, some level drawings will not be used because the number of output frames decreases. When doing the contrary, some level drawings will be repeated because the number of output frames is higher. Interpolations for object movements and special effects variations will be re-computed according to the final frame rate, in order to keep all the interpolations as smooth as possible.
Примечание
When the field rendering is used (by using the Dominant Field option) and the Stretch feature is set for passing from a lower frame rate to a higher one, drawings and images will be interlaced as well, to create newly added frames.
Примечание
The Particles effect may have unexpected results when the scene is stretched to a higher FPS value, as the effect requires the original timing information.
Multiple Rendering: creates automatically for a single scene several output files based on the Xsheet columns (or Timeline layers) content, and according to the FX Schematic. Options are None, FX Schematic Flows and FX Schematic Terminal Nodes (see Creating Multiple Renderings ).
Do stereoscopy activates the stereoscopic 3D output of the scenes. Each frame will be rendered from two different camera view creating two sequences of files, one for each view. The suffixes _l (left) and _r (right) will be used to identify sequences.
Camera Shift: sets the distance between the two camera views.
Примечание
For working properly at least some elements of the scene must have Z-Depth values other than 0 in their positioning. OpenToonz uses these values and the Camera Shift parameter for rendering the stereoscopic effect.
Render button, starts rendering the scene using the current render settings.
Совет
To set the scene output settings:
- Choose Render → *Output Settings…
- Set the options you want to use for the final rendering.
Using The Clapperboard
A clapperboard is a static image intended to display information of the scene. It will be added before the rendered frames, in order to record and convey information to subsequent phases of the pipeline.
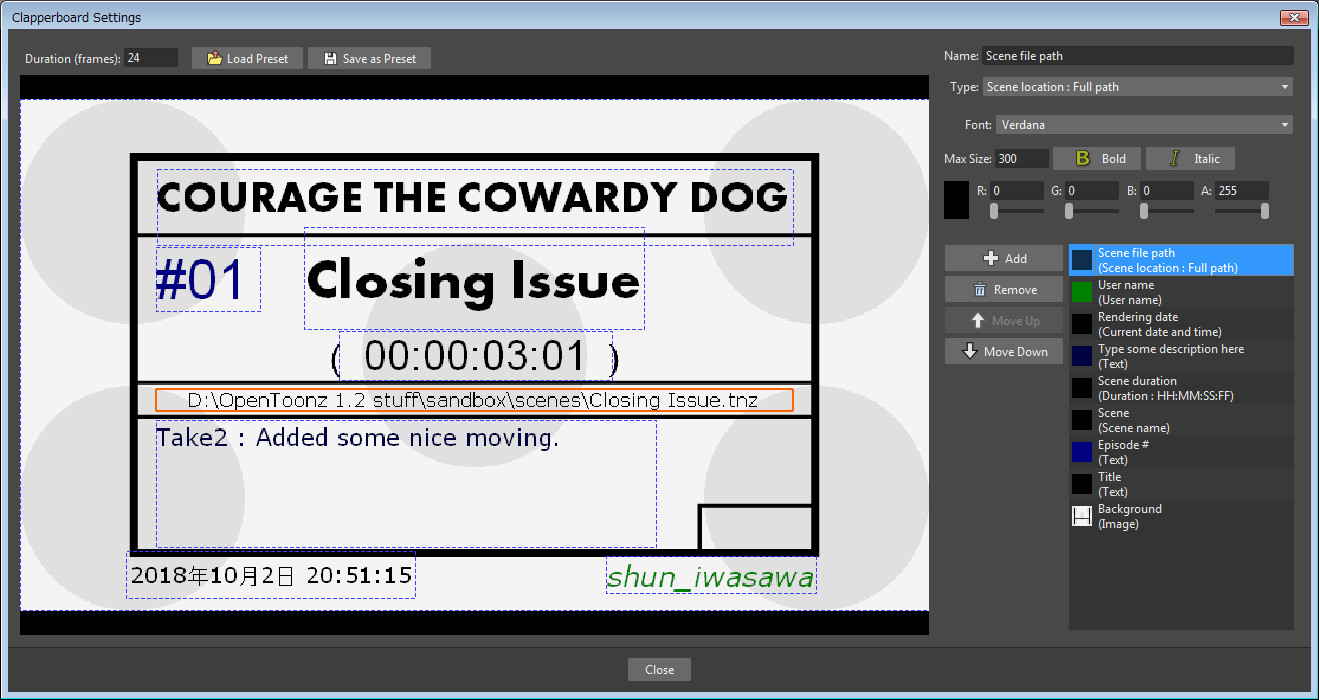
The clapperboard consists of board items. At the bottom-right of the Clapperboard Settings dialog there is a list of all the clapperboard items, which can be layered by moving them Up or Down in the list by using the appropriate buttons. Items can also be created or deleted by using the Add or Remove buttons.
Settings for the currently selected item are displayed above the items list, at the top-right of the Clapperboard Settings dialog. Each item has an information Type:. Most of them will automatically retrieve the correspondent data from the current scene or the system, such as: scene Duration, Scene location, Current date, etc. Other types, such as Text or Image allow to input user defined data to be displayed in the Clapperboard.
The settings can be saved as a Preset in order to be reused later, using the Save as Preset and Load Preset buttons. They can also be stored in the project’s default settings by using the File → Save Default Settings command.
Примечание
WARNING: Adding the Clapperboard will make the scene file to lose compatibility with older versions of OpenToonz. Setting the Duration: back to 0 will remove the clapperboard data from the scene, so that compatibility can be restored.
Совет
To Add a Clapperboard:
- Open the Render → Output Settings… dialog.
- Select any movie type file format (3GP, AVI, MOV, MP4 or WebM).
- In the More Settings section, enable the Add Clapperboard option.
- Click Edit Clapperboard… button. The Clapperboard Settings dialog opens.
- Set the Duration (frames): option to any value greater than 0.
Примечание
Setting the duration to 0 frames will remove the clapperboard data from the scene when it’s saved.
Совет
To temporarily deactivate the Clapperboard:
- Open the Render → Output Settings… → More dialog section.
- Disable the Add Clapperboard option.
Совет
To Delete the Clapperboard:
- Open the Render → Output Settings… → More dialog section.
- Click Edit Clapperboard… button. The Clapperboard Settings dialog opens.
- Set the Duration (frames): option value to 0.
- Save the scene.
Creating Multiple Renderings
With Multiple Rendering: it’s possible to render automatically, from a single scene, several output files based on the Xsheet columns (or Timeline layers) content and according to the FX Schematic. Options are None, FX Schematic Flows and FX Schematic Terminal Nodes.
Flows: creates as many outputs as the flows connecting the column nodes to the Xsheet node. Any effect nodes with multiple input ports met along the flow (such as Matte effects) will be ignored.
Terminal Nodes: creates as many outputs as the number of nodes linked to the Xsheet node; all the columns and effects linked to each of these nodes will be taken into account for the rendering.
The names of the different output files are automatically generated in order to avoid any name conflict between file names. In particular they are built by appending to the output file name: the column name, then the column ID (as can be read in the node tooltip), then the effect name, then the effect ID (as can be read in the node tooltip) in case the effect node was renamed. For example scene01_B(Col3)_My Blur(Blur1)..tif is one of the output files of the scene scene01 , related to the flow going from column B (whose ID is Col3) to the effect node My Blur (whose ID is Blur1).
Примечание
No output will be displayed after the rendering, regardless of Open Flipbook after Rendering being activated in Preferences… → Preview dialog section.
Примечание
If you need more control on the way scene elements are rendered, you may consider using Sub-Xsheets and the Over effect (see Using Sub-Xsheets and Over ). For example if you want a single output for a set of columns/layers, you may collapse them in a Sub-Xsheet (in case of Flows type multiple rendering) or connect them to several Over nodes (in case of Terminal Nodes type multiple rendering).
Rendering Animations with Alpha Channel Information
It’s possible to render a scene with a transparent background color in order to export it to editing systems supporting alpha channel information.
In this case no image has to be used as background, and the output file format has to support alpha channel information, e.g. TIF at 32 or 64 bits per pixel, TGA at 32 bits per pixel, or MOV with codecs supporting alpha (i.e. Animation).
Совет
To render animation with alpha channel information:
- Choose Xsheet → Scene Settings….
- Set the alpha channel of the Camera BG Color to 0 (i.e. transparent).
- Choose an output file format supporting alpha channel information.
Rendering A Loaded Scene
The current scene can be rendered directly while being loaded in OpenToonz according to the defined Output Settings.
By choosing the appropriate range in the Output Settings it’s possible to render the scene in chunks, for example by rendering a section first, and then another one. In this case the animation available in the Output location will always include all frames rendered up to that point, both if the format is a multiple-files output (e.g. TIF or TGA), and a single-file one (e.g. MP4 or MOV). The same applies if a section of the scene has to be rendered again because some corrections were needed.
If the scene contains some audio files and is rendered in a file format supporting audio (for example MP4), all the audio files will be merged to form the soundtrack of the movie (see Creating a Soundtrack ).
Примечание
Audio files loaded in Sub-Xsheets will not be included in the output soundtrack (see Using Sub-Xsheets ).
As soon as the rendering is over, the rendered animation can be automatically displayed in a OpenToonz Flipbook by activating the Open Flipbook after Rendering option in the Preferences… → Preview dialog section; it’s also possible to display blank frames after each rendering playback when looping. If a soundtrack is available for the rendered scene, it’s also possible to listen to it.
When displayed in the Flipbook, the rendering can be checked by using the Flipbook tools (see Using the Flipbook ).
You can also activate the Use Default Viewer for Movie Formats option in the Preferences… → General dialog section, in order to play back the output with its own default viewer, e.g. QuickTime Player for the MOV format.
Совет
To render the currently loaded scene:
Choose Render → Render.
Совет
To display blank frames after each rendering playback when looping:
- Choose File → Preferences… → Preview.
- Do any of the following:
- In Blank Frames: set how many blank frames you want to be displayed after each preview playback, when looping.
- In Blank Frames Color: set the color for the blank frames.
Rendering Scenes in Batch Mode
The rendering of a scene can be added to a task list and performed in batch mode, in order to run it in the background while you perform other work on your computer.
Render tasks can be submitted from the OpenToonz Browser and can be managed and executed in the Tasks pane, together with Cleanup tasks (see Cleaning up Drawings in Batch Mode ).
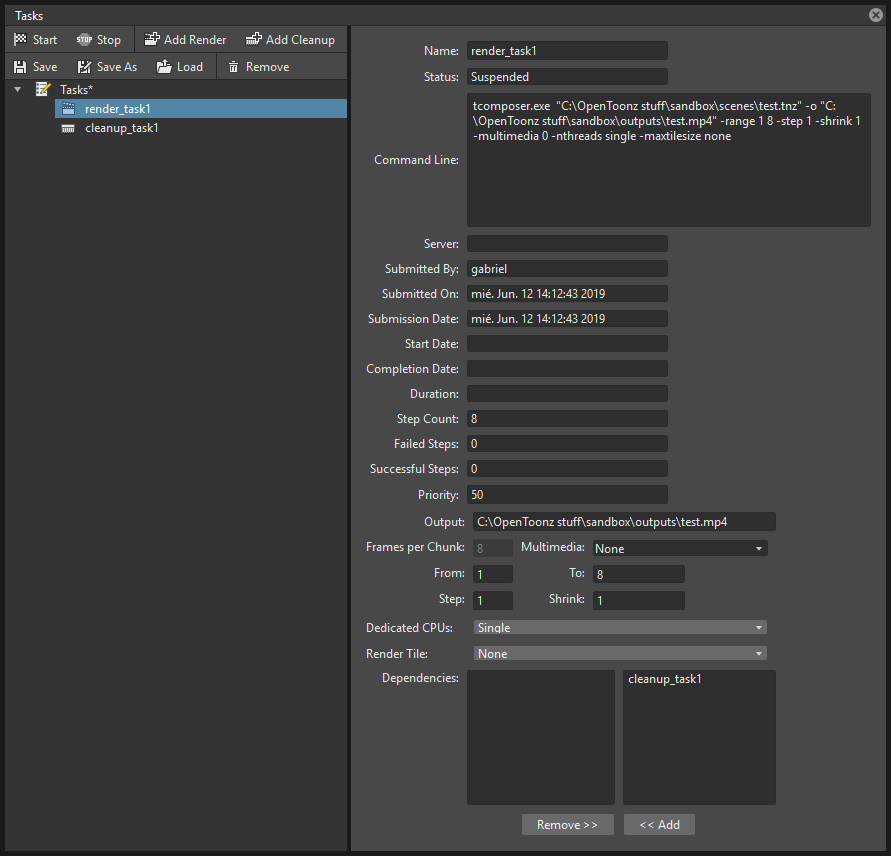
The Tasks pane is divided into two sections: on the left there is the Task tree where all of the Render tasks are displayed with a clapboard icon and all the Cleanup tasks with a brush icon; on the right there is Information about the task selected in the Task tree.
The Task list can be saved as TNZBAT files and loaded back later, in case you want to manage it through different working sessions.
Совет
To Save a Task list:
- Do one of the following:
- Click the Save () or the Save As (
 ) buttons in the top bar of the Tasks pane.
 - Right-click the Tasks item at the top of the list and choose Save Task List or the Save Task List As from the menu that opens.
- Use the Browser that opens to save the list.
Совет
To Load a Task list:
- Do one of the following:
- Click the Load (
 ) button in the top bar of the Tasks pane.
 - Right-click the Tasks item at the top of the list and choose Load Task List from the menu that opens.
- Use the Browser that opens to retrieve and load a previously saved list.
Совет
To resize the Tasks pane sections:
Do any of the following:
- Click and drag the separator to resize sections.
- Click and drag the separator toward the window border to hide a section.
- Click and drag the separator collapsed to the window border toward the window center to display again the hidden section.
Managing and Executing Render Tasks
When a Render task is selected in the tree, in the section on the right of the Tasks pane task-related properties are displayed, some of which can be edited to configure the task. Properties are the following:
- Name displays the task name; it can be edited to better identify the task.
- Status shows if the task is: Waiting, Running, Completed or Failed.
- Command Line displays the command line related to the task execution with arguments and qualifiers.
- Server displays the computer that is running, or will run, the task.
- Submitted By displays the user that submitted the task.
- Submitted On displays the computer from where the task was submitted.
- Submission Date displays when the task was submitted.
- Start Date displays when the task execution started.
- Completion Date displays when the task execution was completed.
- Duration displays how long the execution lasted.
- Step Count displays the number of frames rendered.
- Failed Steps displays the number of frames that failed to be rendered.
- Successful Steps displays the number of frames successfully rendered.
- Priority sets the importance or urgency of the task: tasks with a higher priority will be executed first. It can be edited to change the task priority.
- Output displays the location, name and extension of the rendered output; this information comes from the scene output settings but can be edited here before the rendering.
- Frames Per Chunk sets how the task is divided into sub-tasks in order to distribute the rendering job in the render farm, one sub-task for each computer. It can be edited to change the chunk size (see Using Chunks when Rendering Tasks ).
- From and To set the scene frame range to render; this information comes from the scene output settings but can be edited here before the rendering (see Choosing the Output Settings ).
- Step sets the step for the rendered sequence; this information comes from the scene output settings but can be edited here before the rendering (see Choosing the Output Settings ).
- Shrink sets the reduction value of the rendered sequence resolution; this information comes from the scene output settings but can be edited here before the rendering (see Choosing the Output Settings ).
- Dedicated CPUs sets how many processors are assigned to the rendering process; this information comes from the scene output settings but can be edited here before the rendering (see Choosing the Output Settings ).
- Render Tile sets if the rendering has to be computed in tiles; this information comes from the scene output settings but can be edited here before the rendering (see Choosing the Output Settings ).
- Dependencies lets you set which of the other submitted tasks have to be successfully completed before starting the current task execution: these tasks can be added from the box on the right where all submitted tasks are displayed.
Task execution can be started and stopped from the task list.
When the tasks are executed, the icon color tells the status of the task according to the following color code:
- Grey, when the task is waiting or is not executed yet.
- Yellow, when the task is being executed.
- Green, when the task is successfully executed.
- Orange, when the task is executed with some errors.
- Red, when the task execution has failed.
Совет
To Add scenes to render in the task list:
Do one of the following:
- Click the Add Render button (
 ) in the top bar of the Tasks pane and use the Browser to select a scene file.
 - Select the scenes in the OpenToonz Browser, then right-click any of them and choose Add As Render Task from the menu that opens.
Совет
To Configure the render task in the task list:
- Select a render task in the task list.
- Configure it by using the options available on the right of the list.
Совет
To select tasks in the task list:
Do any of the following:
- Click a task to select it.
- Shift-click a task to extend the selection up to that task.
- Ctrl-click (PC) or Cmd-click (Mac) a task to add it to, or remove it from the selection.
Совет
To Execute selected tasks:
Do one of the following:
- Click the Start (
 ) button in the top bar of the Tasks pane.
 - Right-click any selected task icon and choose Start from the menu that opens.
Совет
To Stop the execution of selected tasks:
Do one of the following:
- Click the Stop (
 ) button in the top bar of the Tasks pane.
 - Right-click any selected task icon and choose Stop from the menu that opens.
Совет
To Remove selected tasks from the list:
Do one of the following:
- Click the Remove (
 ) button in the top bar of the Tasks pane.
 - Right-click any selected task in the list and choose Remove from the menu that opens.
Совет
To Add or Remove tasks from the Dependencies list:
Do one of the following:
- To Add a task to the dependencies list, select a task in the task list on the right and click the << Add button.
- To Remove a task from the dependencies list, select a task in the dependencies list on the left, and click the Remove >> button.
Using Chunks when Rendering Tasks
If you are using the OpenToonz render farm, it’s possible to divide a task into chunks so that each computer of the farm will render a section of the same render task (see Using the Toonz Farm ).
The default value for the chunk size (expressed in number of frames) can be set using the Render Task Chunk Size in the Preferences… → General dialog section. If the default value is higher than the duration (in frames) of the submitted scene, the value will be automatically adjusted to be equal to the duration of the scene.
Once a task is submitted, it’s possible to change the chunk size by editing the related value in the task properties.
When a task is divided into chunks, each chunk of the task is represented in the task tree as a sub-task.
Render tasks and sub-tasks will be distributed on the farm, one for each computer, so that several tasks can be executed at the same time (see Using the Toonz Farm ).
If you are not using the OpenToonz render farm, dividing the task into chunks is not only useless, but it slows down the rendering process as well. For this reason it’s suggested to use a high Render Task Chunk Size value (e.g. 1000) in the Preferences… → General dialog section.
Примечание
Chunk size is relevant only when animations are rendered as image sequences (for example in TIF or TGA formats).