Сканирование бумажных рисунков
Примечание
Currently OpenToonz DOES NOT SUPPORT the native scanning functionality, as described in this page. Instead you can use the provided GTS scanning and cleaning software, please follow this link to download GTS .
Примечание
Эта страница руководства сохраняется в первоначальном виде на случай, если код сканирования OpenToonz будет активирован в следующей версии.
In order to be managed by OpenToonz, paper drawings have to be scanned into OpenToonz. Paper drawings can be both animation levels, consisting of a large number of sequenced drawings, and other elements such as backgrounds and overlays.
The scan process can be done in different modes, and in case autocenter is needed it has to follow specific guidelines.
Animation levels have to be defined first and then scanned according to a defined set of parameters.
Supported Scanners
OpenToonz supports directly, by using internal drivers, some specific scanners via a USB connection; all the other scanners are supported via any type of connection by using TWAIN drivers.
Примечание
For an updated list of directly supported scanners, please visit the OpenToonz Web site .
If your scanner is supported via internal drivers, the scanning process is managed completely by OpenToonz and the Scan Settings dialog; if it is not, the scanning process is managed by the TWAIN interface.
On Windows, the TWAIN drivers provided with the scanner need to be installed. Note that if you decide to use internal drivers, you have to disable the Windows Image Acquisition (WIA) service on your computer; if you want to use TWAIN drivers, you have to enable it.
On macOS, you need to install the TWAIN drivers only if you are going to use them. Note that if you decide to use internal drivers, any TWAIN driver referring to that scanner has to be removed.
The driver you want to use must be selected according to your scanner before starting the scanning process. You can choose whether to use the internal or TWAIN drivers; in the latter case, you have to select which driver to use from a list based on the TWAIN drivers installed on your computer.
Примечание
When using TWAIN drivers you need to specify the driver every time you restart OpenToonz: the dialog box is automatically displayed when you select any Scan related command.
Совет
To install TWAIN drivers:
Refer to the scanner documentation for more details.
Совет
Windows only - To disable or enable the Windows Image Acquisition (WIA) service:
- Open the Control Panel → Administrative Tools → Services dialog.
- Right-click the Windows Image Acquisition (WIA) service and choose Properties from the menu that opens.
- In the Properties dialog do one of the following:
- Set the Startup Type option to Disabled to use internal drivers.
- Set the Startup Type option to Automatic to use TWAIN drivers.
- Restart the computer.
Совет
Macintosh only - To remove the scanner TWAIN drivers:
Refer to the scanner documentation for more details.
Совет
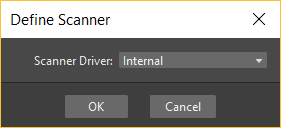
To define the scanner:
- Choose Scan & Cleanup → Define Scanner….
- Do one of the following:
- If your scanner is directly supported, choose Scanner Driver → Internal, and click the OK button.
- If your scanner is not directly supported, be sure that TWAIN drivers are installed, and choose Scanner Driver → TWAIN, and click the OK button: in the dialog that opens, select the TWAIN driver related to your scanner.
Scanning Modes
Drawings can be scanned mainly in three different modes: black and white, greyscale and color.
The first two modes can be used to acquire standard lineart drawings whose outline is usually made in a single color, that during the scanning is acquired as black or dark grey. Even if the outline color is lost during the scanning, later on you can assign one or more colors to it during the painting process.
Black and white scanning gives you the most immediate results, and fewer parameters need to be set. Once a Threshold: value is set, pixels of the scanned image are considered as either black or white. Due to the simplicity of this concept, less time is required to scan the image, and scanned files are lighter to manage. Even if images show hard edges, the proper antialiasing will be added during the cleanup process.
Greyscale scanning, being based on a range of grey values, requires a longer scanning time. Determining Brightness: and Contrast: parameters depends considerably on the individual animated sequence and on what you want to achieve. The greyscale mode also offers Autoadjust options during the cleanup process, useful to even the differences between drawings made by key animators and those made by in-betweeners. See Autoadjusting Greyscale Lineart Drawings .
Color scanning is for scanning colored lineart and other colored images as backgrounds and overlays. Using colors in lineart allows you to draw different lines with different colors, for example a character outline in black and its body shadow in red or in blue. As colored lines can be identified later during the cleanup process, scanning colored artwork in colors allows you to preserve different line colors with no need of intensive painting work. See Processing Colored Lineart Drawings .
Scanning Guidelines for Autocentering
To autocenter scanned drawings during the cleanup process, the pegbar holes need to be detected on the images (see Autocentering ). For this reason they have to be scanned in black, by properly preparing the scanner and performing the scanning process according to the following guidelines.
Preparing Scanners
- If you use the scanner automatic paper feeder, you should stick a piece of thin black tape in the feeder on the opposite side of the scanner lamp. Be sure to stick the black tape in a position to face the peg holes when the paper is fed into the scanner.
- If you use the scanner bed, you should place a black sheet of paper under the scanner cover, so that when a drawing is scanned facing down the glass of the scanner bed, the black paper will be behind it. The black paper must be larger than your animation paper, but it does not have to cover the entire scanner bed.
Scanning Artwork
- It is better to use quite thick animation paper for your artwork: very thin paper may jam the scanner, and the scanner light may pass through picking up some grey from the black paper or tape placed behind it. When this happens, the process will take longer to perform and will produce a poor quality result.
- Avoid using black or colored paper reinforcements around the pegbar holes in your drawing sheets. The scanner has to read the exact shape of the hole punches, and colored reinforcements may cause holes to be scanned larger than their actual size. If you do use white reinforcements, make sure they are aligned directly over the peg holes: if the holes are slightly covered by the reinforcement, the registration may fail.
- Do not draw too close to the pegbar holes. Avoid drawing anything with the same shape or area of the pegbar hole in the pegbar holes area; leave at least 1 cm (~1/2”) of clear space between the pegbar holes and the rest of your drawings. Lines drawn near the pegbar holes may cause the registration to fail.
Defining Animation Levels to Scan
To scan an animation level, first you have to define its name, the number of frames it is made of, and the way its drawings are numbered. Its size and resolution will be set during the scanning session.
The definition can be made drawing by drawing directly in the Xsheet/Timeline, or at once by using the New Level dialog. You can assign it the name and the numbering order you prefer.
In case you use the New Level dialog you can set the number of drawings the level is made of, the animation step to expose the level repeating its frames, and the increment, that sets the way the level drawings are numbered. For example a Step: value 2 repeats each drawing twice in the Xsheet column (or Timeline layer), while an Increment: value 2 numbers the drawings 1, 3, 5, etc.
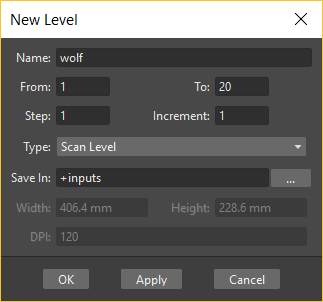
By default scanned drawings are saved in the +inputs directory of the current project; if the +inputs definition uses the $scenepath variable, they are saved only if the scene is saved (see Project Default Folders ).
You can change the location by using either the Path: field in the New Level dialog, or the Level Settings window in case you define a level directly in Xsheet/Timeline.
Settings such as the length of the level and the numbering order can be edited later, as you are free to arrange the images composing your animation level the way you prefer (see Editing Animation Levels ).
When an animation level is defined, the name and numbers for the drawings of the level are displayed in red as no level actually exists yet; the column/layer cells where the level is exposed are colored in light blue, the color denoting full-color images (see Working with Columns/Layers ).
Совет
To define an animation level directly in Xsheet:
- Double-click a cell, then type a name and a number; the name and the number must be separated by a space.
- Press Enter to add a new drawing, and type a different number that will be assigned to the new drawing.
- Go on adding all the drawings you need.
- Click a different cell to end the process.
Совет
To define an animation level with the New Level dialog:
- Do one of the following:
- Select a cell in the Xsheet/Timeline where you want to place your animation level to scan and choose Level → New → New Level…
- Right-click the cell in the Xsheet/Timeline where you want to place your animation level to scan and choose New Level from the menu that opens.
Примечание
If any level is already exposed in the cell column/layer, it will shift down/right from the cell you selected on.
- In the New Level dialog choose Scan Level from the Type: option menu and define its settings, then click the OK button.
Совет
To define the saving location for the level to be scanned:
Do one of the following:
- If you are using the New Level dialog, type in the Path: field, or use the browser button, to set the path for the saving location.
- If you are defining the level directly in Xsheet/Timeline, right-click the level cells and select Level Settings from the menu that opens. In the Level Settings window, type in the Path: field, or use the browser button, to set the path for the saving location.
Примечание
If in the browser you choose any project default folder, in the Path: field the full path will be replace by the related default folder alias (see Project Default Folders ).
Scanning Drawings
According to the driver you are using, internal or TWAIN, the scanning process will be controlled either by the Scan Settings dialog or the TWAIN interface.
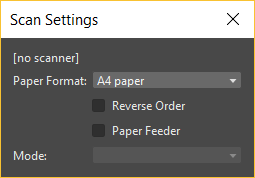
The Scan Settings dialog allows you to define the following:
- Paper Format sets the size for the drawings to be scanned. The option menu contains a list of already defined formats.
- Reverse Order makes the scanning process in a reverse order, starting from the last selected frame to the first one.
- Paper Feeder lets the scanner use the automatic document feeder, in case the scanner has one, to scan all the selected drawings without having to insert one image at a time into the scanner.
- Mode is for setting the scanning mode among: Black and White, Greyscale and Color.
The TWAIN interface is related to the scanner you are using and will be available only when the TWAIN drivers, provided with the scanner, are installed on your computer. Refer to the scanner documentation for more details.
Примечание
The Scan Settings dialog can be used in combination with the TWAIN interface settings to set the Reverse Order option.
The settings, either defined in the Scan Settings dialog or in the TWAIN interface, will be used to scan the drawings selected in the Xsheet/Timeline. In case you select several drawings, and you are using the scanner paper feeder, all the drawings to be scanned will be taken from the feeder; if you are not using the paper feeder, you will be prompted to replace the drawing on the scanner bed, before scanning the following drawing.
You can also select non-consecutive drawings and drawings from different animation levels. Levels will be scanned starting from the first selected column/layer. Only exposed drawings will be scanned according the level numbering order, regardless of the way the animation level is exposed in one or several Xsheet columns (or Timeline layers). The opposite order will be followed if the Reverse Order option is on.
As soon as a drawing is scanned, it is saved and its name and number displayed in the Xsheet/Timeline turn black, as the level now has physical drawings saved on disk.
Images are saved as compressed TIF files with a progressive four-digits number written between the file name and the file extension, e.g. animation.0001.tif , animation.0002.tif , etc. They are displayed in the OpenToonz browser with a double dot before the file extension, e.g. animation..tif .
If you need to scan again an animation level, or a part of it, select the relevant drawings and scan them again. Drawings can be also inserted by editing the level sequence (see Renumbering and Adding Frames in a Level ).
Совет
To scan an animation level:
- In the Xsheet/Timeline, select the drawings you want to scan.
- Choose Scan & Cleanup → Scan Settings… and use the dialog to control scan options.
- Do one of the following:
- If you are using the internal drivers, choose Scan & Cleanup → Scan: the selected drawings will be scanned and automatically saved.
- If you are using the TWAIN drivers, choose Scan & Cleanup → Scan, and guide the scanning process by using the TWAIN interface that opens: the selected drawings will be scanned and automatically saved.
- In case you selected several drawings, do one of the following:
- If you are using the scanner paper feeder, wait for all of the drawings to be scanned.
- If you are not using the paper feeder, you will be prompted to replace the drawing on the scanner bed, before scanning the following drawing.
Примечание
After a drawing is scanned, or several drawings are scanned at once by using the paper feeder, in some TWAIN interfaces you may need to use a specific command (such as Back to Application) to return to OpenToonz before proceeding with the next scanning session. Refer to the scanner documentation for more details.
Setting the Cropbox
When using directly supported scanners it is possible to define a cropbox smaller than the paper format to optimize the scanning process. When the cropbox is set the final scanned image will be the size of the selected paper format, but only the area defined by the cropbox is actually scanned, thus speeding up the scanning operations.
Once defined the cropbox will be used for any scanning performed for the scene.
Примечание
The cropbox size information is not saved along with the scene file; it is also automatically reset when working on a new scene.
Совет
To define the scanning cropbox:
- Choose Scan & Cleanup → Set Cropbox: the drawing currently placed in the scanner is scanned and the cropbox is displayed in red.
- Use the handles along the cropbox to set its size, and click and drag anywhere to change its position.
Примечание
The cropbox default size is the same as the size of the scanned image.
Примечание
The cropbox cannot be moved outside the area of the scanned image.
Совет
To use the defined cropbox when scanning:
Scan drawings after defining the cropbox size (see above ).
Совет
To dismiss the scanning cropbox visualization:
Choose Scan & Cleanup → Set Cropbox.
Совет
To reset the scanning cropbox:
Choose Scan & Cleanup → Reset Cropbox.