Managing Palettes and Styles
In OpenToonz, Toonz Vector and Toonz Raster animation levels comes with their own palette, containing styles that can be used to draw lines and paint lines and areas. Raster levels, on the contrary, can be just edited by using the styles available in the Raster Drawing Palette, that is shared by all of the raster levels in the project.
In Toonz Vector and Toonz Raster levels, palette styles are interactively “linked” to drawn lines and filled areas by using indexes. The main advantage of this method is that if you edit a style of the palette, all the lines and filled areas using that style will be automatically updated. This allows you to change or calibrate colors, even after the painting process has been done, without having to correct the style line by line, or area by area in the image.
In Raster levels, palette styles are simply used to draw or touch up the image, and no link exists between the styles and the already drawn lines. This palette, named Raster Drawing Palette, is shared by all the Raster levels belonging to a specific project and is stored in the +palettes project default folder (see Project Default Folders ).
Note
All the editing performed in palettes and styles is not saved until you save the related Toonz level, the palette itself, or the Save All command is used (see Saving Levels ).
The Palette Editor
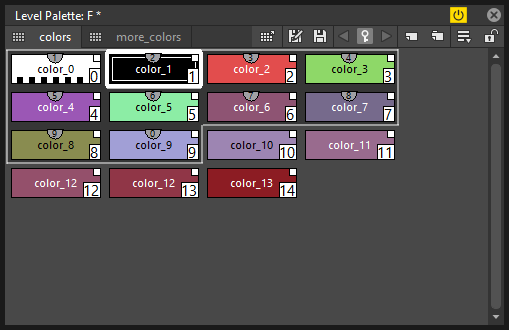
The Palette Editor displays the styles of the current animation level that are (or can be) used, to draw and paint the level.
The default palette of any new Toonz Vector level contains only the plain black color; the default palette of a Toonz Raster level contains either the plain black color, for new levels, or the colors recognized during the cleanup process, for cleaned up levels from scans. Any palette always contains the Color_0 item, that allows you to remove any style from lines and filled areas.
Note
Each palette can contain up to 4096 styles.
Styles in the Palette Editor can be displayed in different modes:
- Small Thumbnails View displays styles as small squares. The style index is displayed at the bottom right corner. Full name of the style can be displayed as a tooltip.
- Medium Thumbnails View displays styles as medium squares. You can read the first letters of the name of the style directly inside the chips; the style index is displayed at the bottom right corner. Full name of the style can be displayed as a tooltip.
- Large Thumbnails View displays styles as large squares. You can read the first letters of the name of the style directly inside the chips; the style index is displayed at the bottom right corner. Full name of the style can be displayed as a tooltip.
- List View displays style thumbnails next to their names in a list; the index of the style is displayed as a tooltip. If the palette styles refer to a studio palette, its path will be displayed along with the style name (see Using the Studio Palette ).
By default the Palette editor is active, that means that it automatically displays the styles of the current animation level, but it can be made inactive in order not to be updated when you select a different level. In this way, by opening more than one Palette editor it will be possible to simultaneously compare and edit several palettes referring to different animation levels.
Palettes also can be saved as independent files in TPL format to be loaded back into the scene to retrieve colors, or to be used with the External Palette effect (see Using the File Browser and External Palette ).
Note
Most of the palette editing described below can be applied to the Palette viewer available in the Studio Palette as well (see Using the Studio Palette ).
Tip
To change the palette display mode:
Do one of the following:
- Click the option button (
 ) on the right of the top bar of the Palette Editor, and choose a display mode from the menu that opens.
 - Use the standard zoom + or - shortcut keys in the Palette Editor to increase or decrease the styles chips size.
Tip
To make the Palette editor inactive or active:
Click the Switch button ( ) on the right of the Palette Editor title bar.
Tip
To save a palette with a different name in a different location:
- Click the Save Palette As button (
 ) in the top bar of the Palette Editor.
 - In the browser that opens choose a location and name for the palette you want to save, and click the Save button.
Note
The Save Palette As command creates a copy of the palette with a different file name and location, but does not change the name and location of the palette used in the scene.
Arranging Palette Styles and Pages
Palette styles can be added, named, reordered and arranged in pages. They can be copied and pasted from one position to another, or from one palette to another.
Note
When styles used for painting drawings are Cut, lines and areas painted with them will be displayed in red; if they are Deleted, you will be prompted whether to delete the styles only and show the lines and areas painted with them in red, or to delete the lines and areas painted with them as well.
Tip
To select a style:
Do one of the following:
- Click it in the Palette Editor.
- Use the number keys on the main or numerical keyboards to select the corresponding style.
Note
When in Medium/Large Thumbnails View a visual cue of which key shortcut corresponds to which style is shown on the upper center of each style chip.
Note
In case of having more than 10 styles in the current palette, you can use the Tab key on the keyboard to switch to the next bank of 10 styles.
Tip
To select multiple styles:
Do one of the following:
- Shift-click to extend the selection.
- Ctrl-click (PC) or Cmd-click (Mac) to add a style to, or remove it from the selection.
Tip
To add a new style:
Click the New Style button ( ) in the top bar of the palette editor.
Tip
To name a style:
When styles are displayed in Medium/Large Thumbnails View or List View modes, double-click the style name to edit it.
Tip
To edit palette styles with the Edit menu commands:
- Select the styles you want to edit.
- Do any of the following:
- Use the Cut command to eliminate selected styles from the palette and keep them in memory for further operations.
- Use the Copy command to keep in memory selected styles for further operations.
- Use the Paste Insert command to paste styles kept in memory in the palette, after the currently selected style. Cut styles will be added preserving their indexes; Copied styles will be added using new indexes.
- Use the Paste Color & Name command to paste styles kept in memory, over the styles selected in the palette, overwriting their content. If the selection contains less styles than those kept in memory, styles in excess will be ignored; if the selection contains more styles than those kept in memory, styles in excess will be left as they are.
- Use the Paste Color command to paste the red, green, blue and alpha values of the styles kept in memory in the styles selected in the palette, preserving their name. If the selection contains less styles than those kept in memory, styles in excess will be ignored; if the selection contains more styles than those kept in memory, styles in excess will be left as they are.
- Use the Paste Name command to paste the names of the styles kept in memory in the styles selected in the palette, preserving their colors. If the selection contains less styles than those kept in memory, styles in excess will be ignored; if the selection contains more styles than those kept in memory, styles in excess will be left as they are.
- Use the Delete command to delete selected styles.
Note
All the Edit menu commands are also available in the menu that opens when right-clicking the selection.
Tip
To move selected styles:
Ctrl-click (PC) or Cmd-click (Mac) and drag the selection to the new position; the insertion point is marked while you drag.
Tip
To move selected styles into a different page:
Ctrl-click (PC) or Cmd-click (Mac) and drag the selection to the tab of the page where you want to put selected styles.
Tip
To move styles into a new page:
Ctrl-click (PC) or Cmd-click (Mac) and drag the selection to the right of the last page tab: a new page will be created containing the dragged styles.
Tip
To remove all the unused styles:
Right-click in the palette and choose Remove Unused Styles from the menu that opens.
Tip
To add a new page:
Do one of the following:
- Click the New Page button (
 ) in the top bar of the Palette Editor.
 - Right-click in the palette area where page tabs are displayed and choose New Page from the menu that opens.
Tip
To name a page:
Double-click the page name to edit it.
Tip
To move a page:
Click and drag the page tab to the new position.
Tip
To delete a page:
Right-click the page tab and choose Delete Page from the menu that opens. The current page cannot be deleted.
Using the Studio Palette
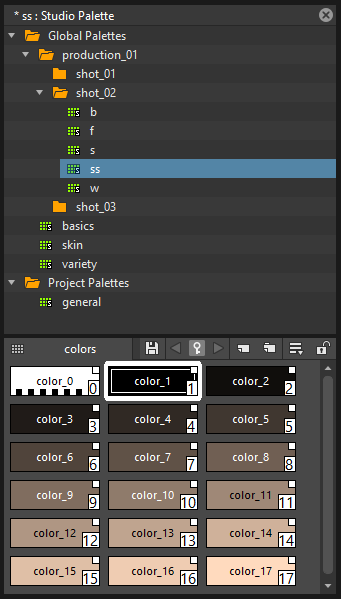
The Studio Palette allows you to store and manage an unlimited number of palettes. It is intended as a library of character and prop palettes related to one or more specific productions. From here Palettes, or Styles contained in them, can be retrieved, assigned, or merged to the current level palette, with no need to define the same styles again and again.
It consists of a Palette Tree and a Palette Viewer: the Palette Tree lists two main folders: Global Palettes and Project Palettes, and all the folders and palettes you add; the Palette Viewer displays the currently selected palette and allows you to edit it as a standard palette (see The Palette Window ).
Any level palette can be added to the Studio Palette; if a Color Model is defined for that level, it will be saved along with the palette and retrieved any time that palette will be assigned to a level (see Using a Color Model ).
Palettes added to the Global Palettes folder will be available in the Studio Palette in any OpenToonz session, regardless of the current project.
Palettes added to the Project Palettes folder will be available only when the current project is the relevant one. For example if your current project is Production One, and you add some palettes to the Project Palettes folder, those palettes will be available only when the current project is Production One.
If you want to add to the Studio Palette a series of palettes you have previously created and stored in a folder, you can also automatically retrieve them by searching that specific folder.
Styles that are imported from the Studio Palette to the palette of the current level are marked with a small white square. This reference can be used to link styles to the original Studio Palette styles: the link can be activated or deactivated anytime for any selection of styles.

When the link is activated, an arrow is displayed on the small white square, and the style will be updated according to the original Studio Palette style. When the link is deactivated, the style can be modified regardless of the original Studio Palette style.
Linking animation level palettes to the Studio Palette can assure color consistency for the whole production, because as soon as a change is needed, it can be done in the Studio Palette, automatically updating all the linked animation levels palettes and, consequently, drawings.
In the level palette, the information about which Studio Palette the palette styles refers to can be retrieved in the List View mode, where, next to the style thumbnails and names, the path to the source studio palette is displayed.
When palettes are added to Global Palettes, they are copied to the studiopalette folder located where OpenToonz projects are stored (see Setting up Projects ).
When palettes are added to Project Palettes, they are copied to the +palettes folder you specified for the current project (see Project Default Folders ).
These folders can be used, for example, to move your Studio Palette, or the Project Palette, to a different network, or to make a backup copy of it.
Tip
To add an empty palette:
- Select the folder where you want to create the new palette.
- Right-click the folder where you want to locate the palette and choose New Palette from the menu that opens.
Tip
To name a palette:
Double click its name and type a new name.
Tip
To view a palette in the Studio Palette:
Select it in the Palette Tree.
Tip
To add a level palette to the Studio Palette:
- Select the level to display its palette.
- Do one of the following:
- Click the Palette button (
 ) in the top bar of the palette editor and drag the current palette to the Studio Palette folder where you want to locate it. The palette will retain its name.
 - Add an empty palette in the Studio Palette editor, right-click it and select Replace with Current Palette from the menu that opens.
Tip
To add palettes by searching in a computer folder:
- Select the folder where you want to place palettes retrieved during the search.
- Right-click the folder and select Search for Palettes from the menu that opens.
- Browse to the computer folder you want to scan.
Tip
To add a new folder:
- Select the folder where you want to create the new folder.
- Right-click the folder where you want to locate your new folder and choose New Folder from the menu that opens.
Tip
To name a folder:
Double click its name and type a new name.
Tip
To delete a palette or a folder:
- Select it in the Palette Tree.
- Right-click the palette or the folder you want to delete and choose Delete Palette from the menu that opens.
Tip
To rearrange palettes in the Studio Palette folders:
Click and drag the palette from the current location to the new one.
Tip
To load a palette from the Studio Palette to the current level palette:
Do one of the following:
- Click and drag the palette, from the Studio Palette Tree to the Palette button () in the top bar of the Palette Editor.
- Right-click the palette you want to use and select Load into Current Palette from the menu that opens.
Note
In case the palette misses some styles used to paint the level drawings, you will be prompted whether to delete the styles only and show the lines and areas painted with them in red, or to delete the lines and areas painted with them as well.
Tip
To reorder the current palette using a specific Studio Palette as reference:
- Select the level that uses the palette that has to be modified.
- Select into the Studio Palette pane the palette you want to use as reference.
- Right-click the palette and select Adjust Current Level to This Palette.
- Insert a Tolerance value in the window that opens.
Note
The Tolerance parameter defines the range of RGB values that will be used for matching colors from the curret palette to those of the Studio Palette. Default value of 0 means no range use, so just colors with the same RGB values will be reordered and all the others will be added as new colors.
Note
All the colors of the Studio Palette will be transferred into the current palette, all of this colors will show the Reference to Studio Palette box. The colors that are used in both palettes will be ordered, for positon and color index, as in the reference Studio Palette. All the colors that are new into the curent palette will be moved after the last transferred color. Pages will be added when required.
Tip
To merge a palette from the Studio Palette to the current level palette:
Do one of the following:
- Click and drag the palette from the Studio Palette tree to the level palette.
- Right-click the palette you want to use and select Merge to Current Palette from the menu that opens.
Tip
To replace a palette from the Studio Palette with the current palette:
- Select the palette you want modify in the Global Palette, or Project Palette.
- Right-click the palette and select Replace with Current Palette.
Tip
To copy styles from the Studio Palette to the current level palette, and vice versa:
- Select the palette in the Studio Palette to display it in the palette viewer.
- Select the styles you want to copy in one palette.
- Ctrl-click (PC) or Cmd-click (Mac) and drag the selection to the other palette.
Note
If you drag the selection to the right of the last page tab, a new page will be created containing the dragged styles.
Tip
To activate a Style Link to the studio palette:
- Select the styles that have been imported from the Studio Palette.
- Right-click the selection and select Toggle Link to Studio Palette from the menu that opens.
Tip
To deactivate a style link to the Studio Palette:
- Select the styles that have been linked to the Studio Palette.
- Right-click the selection and select Toggle Link to Studio Palette from the menu that opens.
Tip
To remove style reference to the Studio Palette:
- Select the styles that have a reference to the Studio Palette.
- Right-click the selection and select Remove Reference to Studio Palette from the menu that opens.
Tip
To resize the Studio Palette sections:
Do any of the following:
- Click and drag the separator to resize sections.
- Click and drag the separator towards the pane border to hide a section.
- Click and drag the separator collapsed to the pane border towards the pane center to display again the hidden section.
Animating Palettes
For Toonz Vector and Toonz Raster levels, colors in a palette can be animated and changed according to the frames of the Xsheet/Timeline.
The animation is defined by keys that refer to the absolute timing of the Xsheet/Timeline: this means that there is no relation between the level length and the length of the animation of the palette colors. For example you can create a palette animated from frame 1 to 100 even if its level is only five frames long.
The color animation will always refer to the Xsheet/Timeline timing, even if you move the related level to a different frame range. For example, if you animate a palette from frame 1 to frame 20, and the level is exposed after frame 20, no color animation will be visible and the color used for the level will refer to the last key of the colors animation.
Keys are set for all the palette Colors and Settings (in the case of Generated styles and Textures) at once, and can be navigated directly in the Palette Editor (with the expected update of the viewer content) to check the color animation.
Tip
To define a palette key:
- Select in the Xsheet/Timeline the frame where you want to define the key.
- Click the Key button (
 ) in the top bar of the Palette Editor.
Tip
To check if the palette has a key at a specific frame:
Select the frame you want to check: if the Key button () in the top bar of the Palette Editor is blue, the colors have a key at the current frame.
Tip
To navigate the palette keys:
Use the Previous Key ( ) and Next Key buttons (
 ) available at the side of the key button in the top bar of the palette editor.
Tip
To remove a palette key:
- Do one of the following to select the frame you want to remove the key from:
- Select it in the Xsheet frame column or the Timeline frame ruler.
- Navigate the palette keys.
- Click the Key button () in the top bar of the Palette Editor to remove it.
Editing Styles
Palette styles can be modified with the Style Editor. There are four types of styles to choose from: Color, Texture, Vector and Raster. Under the Vector tab, there are the Generated, Trail and Vector Brushes categories, available for Toonz Vector levels only. For several types of styles, there is also control over various styles options in the Settings tab.
An Auto button lets you decide whether the edits have to be assigned automatically to the style, or only after you click on the Apply button. In the bottom right corner you can see swatches for the previous and new style status; if you want to go back to the previous style, simply click on it.
Only the first style in the palette, labeled Color_0, cannot be edited: instead, it allows you to remove any style from lines and filled areas.
Tip
To open the Style Editor as a floating window:
Do one of the following:
- Choose Windows → Style Editor.
- Double-click the style you want to edit in the Palette Editor.
Tip
To automatically apply the editing to the style:
Activate the Auto button in the Style Editor.
Tip
To apply manually the editing to the style:
- Deactivate the Auto button in the Style Editor.
- Click the Apply button every time you want to apply the editing to the style.
Tip
To return to the old style cancelling the editing:
Click the style swatch in the very bottom right corner of the Style Editor.
Colors
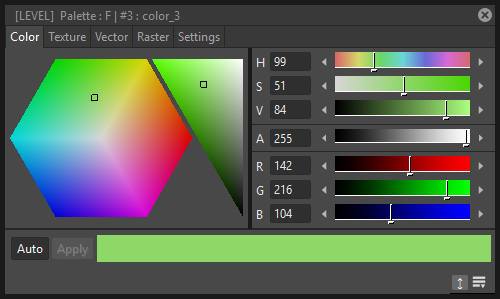
Colors can be defined either by Hue / Saturation / Value or the Red / Green / Blue values. They can be used for both drawing lines and filling areas.
You can also set the opacity with the Alpha slider: the lower the value, the more transparent the color. You can check the opacity of the color with the checkerboard pattern visible beneath the color, whose visibility is proportional to the color transparency.
To edit a color you can use either the sliders or the color wheel. To pick a color from the sliders or from the wheel, click it; to adjust values you can use the arrowhead buttons available at each slider ends.
Colors can also be picked from the Viewer content by using the RGB Picker tool ( ), whose Type: option lets you choose the following: Normal, to pick values of a color; Rectangular, to pick the average values of the colors included in the box you define; Freehand, to pick the average values of the colors included in the area you outline by clicking and dragging; and Polyline, to pick the average values of the colors included in the area you outline by defining a series of lines.
If the current style is not a plain color, the color you edit in the Color tab is the color used by the special style. If the special style uses more than one color, you can select the color to edit in the row of thumbnails available below the Auto and Apply buttons. (see Special Styles ).
Tip
To pick the color from the viewer content:
- Select the RGB Picker tool ().
- Do one of the following:
- Click in the viewer to pick the needed color values.
- Set the type to Rectangular, then click and drag in the viewer to define a box which picks the average values of the colors included in the box.
- Set the type to Freehand, then click and drag in the viewer to outline an area which picks the average values of the colors included in the area.
- Set the type to Polyline, then click in the viewer to outline an area by defining a series of lines and this will pick the average values of the colors included in the area.
Textures
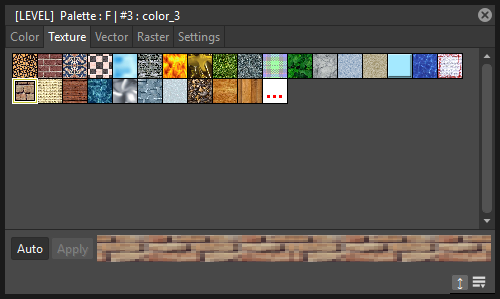
Textures can be used both for drawing lines and filling areas. They can be selected from a list available in the Texture tab, where your own textures can be added as well, or custom textures can be added by clicking the Custom Texture button.
Texture styles can be used both in Toonz Vector and Toonz Raster levels, but only when applied to Toonz Raster levels they react to the settings values in the Settings tab (see Texture Settings ).
Image sequences can also be loaded as textures, provided they follow the OpenToonz rules for being detected as such. In the case an image sequence is loaded as a texture their frames will change with each new frame of the Xsheet/Timeline, and will cycle when it reaches its last frame.
Tip
To add a new texture to the Texture library:
- Create the image you want to use as a texture with the following characteristics:
- The number of pixels of the width and height of the image has to be equal to 2 to the power of any number (i.e. 2, 4, 8, 16, 32, 64, 128, 256, etc.); if not, texture images will show stretched.
- The file has to be saved in any of the following formats: TIF, TGA, PNG, BMP, JPG, NOL, RGB and SGI.
- Save the texture file in one of the following folders:
<projectroot>\library\texturesorOpentoonz stuff\library\textures(see Setting up Projects ).
Custom Textures
Custom textures can be loaded for drawing both lines and filling areas. The custom texture will be saved into the Palette and its icon will be replaced with an icon of the loaded texture.
Tip
To add a custom texture:
- Select a style in the Palette editor.
- Go in the Texture tab of the Style Editor and press the Custom Texture button.
- Go in the Settings tab, use the Load From File field and choose the image (or image sequence) you want to use as texture.
- In Toonz Raster levels, press the Preview button to visualize the texture.
Texture Mapping
Texture mapping is the way the texture is applied to the lines or areas using the style. It’s applied differently either if the level is a Toonz Vector or Toonz Raster one:
- Toonz Vector: Texture mapping is performed using the vector stroke parametric coordinates; this means that for lines the texture automatically “follows” the stroke’s shape and thickness, whether for areas the texture image is tiled to cover the area painted with the style.
- Toonz Raster: Texture mapping is performed using standard mapping coordinates; this means that the texture image is tiled to cover the lines or areas painted with the style.
Note
A more powerful texture mapping can be performed by using the Texture and Pinned Texture special FX (see Toonz Level ).
Texture Settings
Textures applied to styles used in Toonz Raster levels allow to set various parameters such as:
- Use As Pattern, allows to use the brightness of the image to modulate the brightness of the plain Color of the style to which it is applied.
- Position, allows to control how the texture is applied to the drawing. Options include: Fixed (the texture will be fixed and slide when the character moves), Automatic (the texture will follow the character’s position during the animation) and Random (the texture position will change at each frame in a random way);
- Scale, allows to set the scale of the texture pattern.
- Rotation, allows to set a rotation angle to the texture pattern.
- X displ and Y displ, allow to offset the texture pattern horizontally or vertically.
- Contrast, allows to change the contrast of the image applied as texture.
Generated Styles

Generated styles use a number of mathematical functions to create effects that can be used either for vector strokes or for filling areas defined by vectors. They can be selected from a list available in the Generated section of the Vector tab, where styles suitable for vector strokes have a thumbnail representing how they will look as a diagonal line; styles suitable for filling have a thumbnail representing the top right corner piece of an area.
Generated styles can simulate for instance a frieze, a leaf, or a pencil stroke along a vector, or allow you to fill areas with special effects such as polka dots.
Generated styles can be customized by defining the parameters available in the Settings tab. This allows you to have many similar styles, each with a different configuration of settings.
Colors used by generated styles can be modified by using the Color tab available in the Style Editor.
The first item available in the list allows you to remove the Generated style, in order to return it to a Color style.
Tip
To change colors used by a generated style:
- Move to the Color tab in the Style Editor.
- Edit the color using the wheel and sliders.
- If the generated style uses more than one color, select the color to edit in the row of swatches available below the Auto and Apply buttons.
Trail Styles
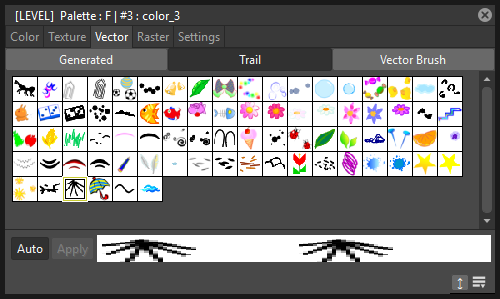
Trail styles are available for vector levels only. A trail style repeats an image or an animation level, created with OpenToonz or third party software, along the vectors of a vector level. Trail styles cannot be used to paint areas.
In the Trail section on the Vector tab you can select the image or the animation level you want to use as a style. You can add to the list your own animation levels as well: both OpenToonz animation levels (PLI) and full-color images or sequences of full-color images (BMP, JPG, NOL, PIC, PICT, PCT, PNG, RGB, SGI, TGA, TIF and TIFF) are supported.
Note
PLI levels are rendered according to the vector length and thickness, thus appearing jagged when zoomed in. If the output format is a vector one, then the PLI level will remain vector-based. (see Choosing the Output Settings ).
The images are repeated changing their placement and size according to the vector’s shape and thickness. If the animation levels contains different drawings, they are repeated cyclically along the vector length.
Parameters such as the distance between subsequent images along the vector and their rotation can be defined in the Settings tab (see Settings ).
Tip
To add a new custom style:
- Create an image or an animation level with OpenToonz, or with third-party software.
- Save it in the folder
Projectroot\library\custom styles(see Setting up Projects ).
Vector Brush Styles
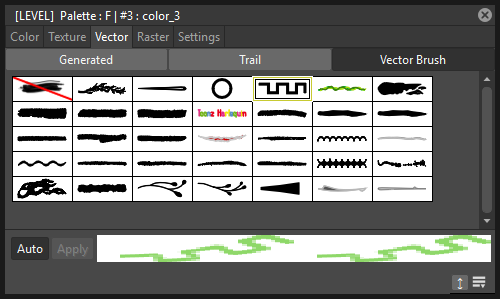
Vector brush styles are available for vector levels only. A vector brush applies a vector image, created with OpenToonz, along the vector strokes of a vector level. Vector brush styles cannot be used to paint areas.
In the Vector Brush section of the Vector tab, you can select the image you want to use as a style. You can add to the list your own PLI images as well.
Note
PLI levels are rendered according to the vector length and thickness, thus appearing jagged when zoomed in. If the output format is a vector one, then the PLI level will remain vector-based. (see Choosing the Output Settings ).
The Vector Brush image is applyed to each stroke of the drawing that use this style according to the stroke’s shape and thickness. If the animation levels used as vector Brush contains different drawings, only the first one will be taken into account.
Colors used by vector brushes can be modified by using the Color tab available in the style editor.
The first item available in the list allows you to remove the Vector Brush in order to return it to a Color style.
Tip
To add a new vector brush:
- Create a PLI level with OpenToonz.
- Save it in the folder
Projectroot\library\vector brushes(see Setting up Projects ).
Tip
To change colors used by a Vector Brush style:
- Move to the Color tab in the Style Editor.
- Edit the color using the wheel and sliders.
- If the Vector Brush uses more than one color, select the color to edit in the row of swatches available below the Auto and Apply buttons.
Raster Brushes
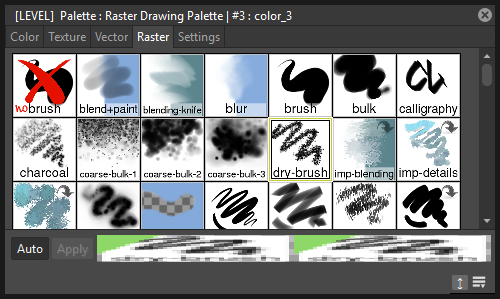
Raster brushes are available to paint in Raster levels and, with some limitations, in Toonz Raster levels. They are essentially brushes compatible with the MyPaint open source painting software.
The Raster brushes use the Color from the current style as a base, and all its remaining options can be found in the Settings tab of the Style Editor pane (see Settings for Raster Brushes ).
Note
In Toonz Raster levels, currently only additive Raster brushes can be used (i.e. brushes that add paint to a level, not the ones that erase, blend or blur already painted strokes).
Note
In Toonz Raster levels, Raster brushes use only the Opacity values of the selected brush to paint with the current style color, and cannot use any of the other Color related settings of that brush.
Note
In Toonz Raster levels, Raster brushes can only paint lines (they cannot be used to fill areas).
Settings
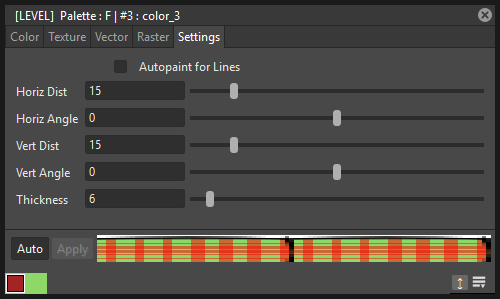
The Settings tab is available for defining some style properties.
For Toonz Raster levels, it contains only the Autopaint for Lines option, that can be used to automatically paint border lines of an area, with the same color used to fill that area (see Using the Autopaint for Lines Option ).
For Toonz Vector levels, it contains parameters only when the style is a Generated or Trail one.
When the style is a Generated one, the Settings tab contains one or more sliders that allow you to finetune the predefined style to your needs. When the style is a Trail one, the Settings tab contains two sliders: Distance sets the space between two subsequent images of the animation level used as a trail; Rotation sets the angle of all the images.
You can add the same Generated or Trail style as many times as you want, each time defining different settings for it.
Settings for Raster Brushes
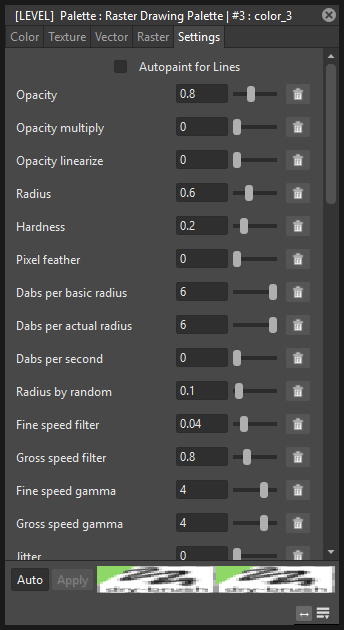
Raster brushes have an extensive set of parameters to finetune their behaviour. These parameters can be changed in the Settings tab of the Style Editor pane. They include:
Basic
- Radius, basic brush radius (logarithmic). 0.7 means 2 pixels; 3.0 means 20 pixels.
- Radius by random, alter the radius randomly in each dab. You can also do this with the by_random input on the radius setting. If you do it here, there are two differences:. 1) the opaque value will be corrected such that a big-radius dabs is more transparent. 2) it will not change the actual radius seen by dabs_per_actual_radius.
- Hardness, hard brush-circle borders (setting to 0 will draw nothing).
- Pixel feather, (info needed).
- Eraser, how much this tool behaves like an eraser. 0.0 for normal painting; 1.0 for standard eraser behavior; 0.5 pixels go towards 50% transparency.
- Jitter, add a random offset to the position where each dab is drawn. 0.0 is disabled; 1.0 standard deviation is one basic radius away; <0.0 negative values produce no jitter.
- Elliptical dab: angle, this defines the angle by which elliptical dabs are tilted. 0.0 makes horizontal dabs; 45.0 produces 45 degree dabs, turned clockwise; 180.0 is horizontal again.
- Elliptical dab: ratio, aspect ratio of the dabs; must be >= 1.0, where 1.0 means a perfectly round dab.
- Direction filter, a low value will make the direction input adapt more quickly, a high value will make it smoother.
- Snap to pixel, (info needed).
- Pressure gain, change the gain factor for the pressure of the brush.
Opacity
- Opacity, 0 means brush is transparent; 1 fully visible. (also known as alpha).
- Opacity multiply, this gets multiplied with Opacity. It is used for making opaque depend on pressure (or other inputs).
- Opacity linearize, correct the nonlinearity introduced by blending multiple dabs on top of each other. This correction should get you a linear (“natural”) pressure response when pressure is mapped to opaque_multiply, as it is usually done. 0.9 is good for standard strokes, set it smaller if your brush scatters a lot, or higher if you use dabs_per_second. 0.0 the Opacity value above is for the individual dabs; 1.0 the Opacity value above is for the final brush stroke, assuming each pixel gets (dabs_per_radius*2) brush dabs on average, during a stroke.
- Lock alpha, (info needed).
Dabs
- Dabs per basic radius, how many dabs to draw while the pointer moves a distance of 1 brush radius (i.e. the base value of the radius).
- Dabs per actual radius, same as above but the radius actually drawn is used, which can change dynamically with pressure.
- Dabs per second, dabs to draw each second, no matter how far the pointer moves.
Smudge
- Smudge, paint with the smudge color instead of the brush color. The smudge color is slowly changed to the color you are painting on. 0.0 do not use the smudge color; 0.5 mix the smudge color with the brush color; 1.0 use only the smudge color.
- Smudge length, this controls how fast the smudge color becomes the color you are painting on. 0.0 immediately change the smudge color; 1.0 never change the smudge color.
- Smudge radius, (info needed).
Speed
- Fine speed filter, how slow the input fine speed is following the real speed. 0.0 change immediately as your speed changes (not recommended, but try it).
- Gross speed filter, same as Fine speed filter, but note that the range is different.
- Fine speed gamma, this changes the reaction of the Fine speed input to extreme physical speed. You will see the difference best if Fine speed is mapped to the radius. -8.0 very fast speed does not increase Fine speed much more; +8.0 very fast speed increases Fine speed a lot. For very slow speed the opposite happens.
- Gross speed gamma, same as Fine speed gamma for gross speed.
- Offset by speed, change position depending on pointer speed. = 0 disable; > 0 draw where the pointer moves to; < 0 draw where the pointer comes from.
- Offset by speed filter, how slow the offset goes back to zero when the cursor stops moving.
Tracking
- Slow position tracking, slowdown pointer tracking speed. 0 disables it, higher values remove more jitter in cursor movements. Useful for drawing smooth, comic-like outlines.
- Slow tracking per dab, similar as above but at brushdab level (ignoring how much time has past, if brushdabs do not depend on time).
- Tracking noise, add randomness to the mouse pointer; this usually generates many small lines in random directions; maybe try this together with Slow tracking.
Stroke
- Stroke threshold, how much pressure is needed to start a stroke. This affects the stroke input only. OpenToonz does not need a minimal pressure to start drawing.
- Stroke duration, how far you have to move until the stroke input reaches 1.0. This value is logarithmic (negative values will not inverse the process).
- Stroke hold time, this defines how long the stroke input stays at 1.0. After that it will reset to 0.0 and start growing again, even if the stroke is not yet finished.. 2.0 means twice as long as it takes to go from 0.0 to 1.0; 9.9 and bigger stands for infinite.
Color
- Color hue, (info needed).
- Color saturation, (info needed).
- Color value, (info needed).
- Change color hue, change color hue. -0.1 small clockwise color hue shift; 0.0 disable; 0.5 counterclockwise hue shift by 180 degrees.
- Change color lightness (HSL), change the color lightness (luminance) using the HSL color model. -1.0 blacker; 0.0 disable; 1.0 whiter.
- Change color satur. (HSL), change the color saturation using the HSL color model. -1.0 more grayish; 0.0 disable; 1.0 more saturated.
- Change color value (HSV), change the color value (brightness, intensity) using the HSV color model. HSV changes are applied before HSL ones. -1.0 darker; 0.0 disable; 1.0 brighter.
- Change color satur. (HSV), change the color saturation using the HSV color model. HSV changes are applied before HSL ones. -1.0 more grayish; 0.0 disable; 1.0 more saturated.
- Save color, (info needed).
- Colorize, (info needed).
Custom
- Custom input, set the custom input to this value. If it is slowed down, move it towards this value (see below). The idea is that you make this input depend on a mixture of pressure/speed/whatever, and then make other settings depend on this ‘custom input’ instead of repeating this combination everywhere you need it. If you make it change by random you can generate a slow (smooth) random input.
- Custom input filter, how slow the custom input actually follows the desired value (the one above). This happens at brushdab level (ignoring how much time has past, if brushdabs do not depend on time). 0.0 no slowdown (changes apply instantly).
Changing the Type of Style
When you select a Color, Texture, Generated, Trail, Vector Brush or Raster brush style in the Style Editor, you automatically assign it to the current style, thus changing its style type.
A different case is when you want to change back from a Generated, Vector Brush or Raster brush style to a Color one, because when the current style is one of those types, the Color tab is used for setting their colors. So, in this case you first have to remove the Generated, Vector Brush or Raster brush styles by using the first swatch available in the swatch list, and then move to the Color tab.
Also note that when you change from a style suitable for both lines and areas to a style suitable only for lines, the areas painted with that style will become invisible, and vice versa. For example if you change a style from Color to Trail, all areas painted with that style will become invisible. If you modify the style so that it’s suitable again for lines and areas, the invisible parts will become visible again.
Tip
To change the type of style from Color to any other:
Choose an item in the Texture, Vector or Raster tabs.
Tip
To change the type of style back to Color:
Choose the Color tab and start moving a slider or the selector in the color wheel.
Tip
To change the type of style from Generated, Vector Brush or Raster brush back to color:
- In the Generated, Vector Brush or Raster brush sections of the Style Editor select the first style in the list (the top-left most one) to remove any special type from the current style.
- Choose the Color tab and start moving a slider or the selector in the color wheel.
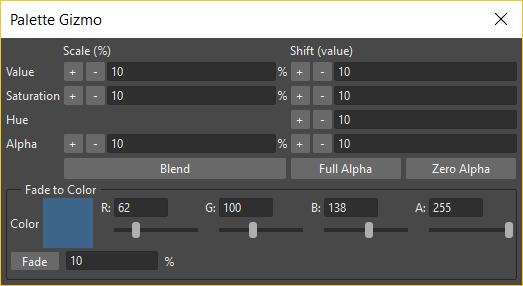
Editing Several Styles at the Same Time
You can modify several styles at the same time by using the Palette Gizmo. It allows you to scale or shift the value, saturation, hue and alpha of the selected styles, blend them, or fade them to a specific color.
Note
Only the Color styles are affected by the Palette Gizmo editing and the blending. e.g. Generated and Trail styles will not be affected.
Tip
To open the Palette Gizmo:
Right-click the selected styles and choose Palette Gizmo from the menu that opens.
Tip
To change the value of the selected styles:
- Set the percentage of variation or the shift magnitude you want to apply to the styles value.
- Do one of the following:
- Click the + button to increase the value on the set percentage or shift magnitude.
- Click the - button to decrease the value on the set percentage or shift magnitude.
Tip
To change the saturation of the selected styles:
- Set the percentage of variation or the shift magnitude you want to apply to the styles saturation.
- Do one of the following:
- Click the + button to increase the saturation on the set percentage or shift magnitude.
- Click the - button to decrease the saturation on the set percentage or shift magnitude.
Tip
To change the hue of the selected styles:
- Set the shift magnitude you want to apply to the styles hue.
- Do one of the following:
- Click the + button to increase the hue on the set shift magnitude.
- Click the - button to decrease the hue on the set shift magnitude.
Tip
To change the alpha of the selected styles:
- Set the percentage of variation or the shift magnitude you want to apply to the styles alpha.
- Do one of the following:
- Click the + button to increase the alpha on the set percentage or shift magnitude.
- Click the - button to decrease the alpha on the set percentage or shift magnitude.
Tip
To blend selected styles:
- Select a set of styles in the Palette Editor.
- Click the Blend button: style colors will be blended from the first to the last color of the selected styles.
Tip
To fade the selected styles to a specific color:
- Choose the color you want to fade the selection to by doing one of the following:
- Set the Red, Green and Blue values.
- Click the color thumbnail and use the Style Editor to edit it (see Plain Colors ).
- Set the percentage of the fading you want to apply to the styles.
- Click the Fade button to fade styles to the set color, according to the set percentage.
Using the Name Editor
The Name Editor allows to systematize the naming of styles used in a production, by defining preset names for Character, Part and Suffix. In that way, styles in a palette can easily be given significant names that will ease its use later on the production.
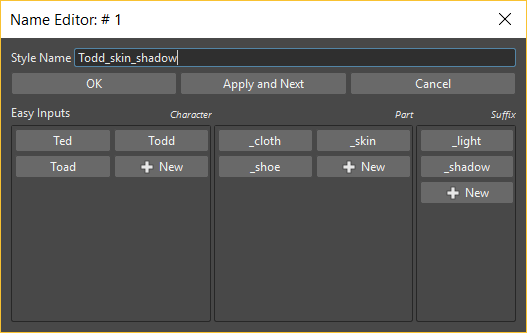
Note
Currently there’s no standard separator character inserted between the different preset names used, so if you want to have those separated by an underscore, for example, you should insert that character at the beginning or end of the different names in each category, as shown in the image above.
Tip
To open the Name Editor:
Right-click in the Palette Editor and choose Name Editor from the menu that opens.
Tip
To delete a preset name:
Right-click over the desired preset name and choose Remove from the menu that opens.