استفاده از سیستم کنترل نسخه
The version control system keeps in a central repository a constant history of revisions for every file in the production database.
The central repository must be located in a shared resource (that can be a computer in your local network or an internet-based repository), while the local copy of files, called working copy, at a specific time or revision, should be located on the computer you use.
When you need to work on a file, you can get it from the central repository to your working copy, and edit it; when you finish working on the file and you want to submit the changes, you can put it back from your working copy to the central repository.
The file you put will be saved as the last revision of the file, while the previous revisions will be retained as file history, and all the users sharing the same central repository can get if from there. In case a previous version of the file is needed, it is always possible to retrieve it from the central repository.
OpenToonz supports the Subversion version control system, which is one of the most popular version control systems, used in many high-scale open source projects.
توجه
The central repository defined for your version control system behaves exactly as an OpenToonz projectroot, therefore the project management under the version control system is the same, only referencing to the central repository instead of the projectroot (see Managing Projects ).
Installing the Version Control System
The version control system works as a client/server tool: the server stores all of your files in a central repository, and a client is used to get files to your working copy and put file changes to the server.
Installing the Version Control Server
It's possible to configure a computer in your local network as the version control server by installing Subversion 1.6 or later, or it's possible to use an on-line service (e.g. Assembla).
You can go to the Subversion starting page for downloading it.
Contact your system administrator to configure a version control server.
نصب کلاینت کنترل نسخه روی ویندوز
On Windows the setup of a version control client requires the download and installation of the Subversion client 1.6 or later.
You can go to the Subversion download page for downloading it. There you should look for the available binary packages and download a version control client for Windows. We suggest the use of CollabNet Subversion Command-Line Client.
توجه
If an older Subversion release is used some version control features might not work.
نصب کلاینت کنترل نسخه روی Macintosh
On Macintosh the setup of a version control client depends on the OS version.
If the OS is Snow Leopard (version 10.6) or later, the setup requires no installation as the version control client is included in the operating system.
If the OS is older than Snow Leopard, the setup requires the download and installation of the Subversion client 1.6 or later.
You can go to the Subversion download page for downloading it. There you should look for the available binary packages and download a version control client for Macintosh.
After the installation is very important to check where Subversion is installed, as this information is needed to configure the version control in OpenToonz: this information is displayed in the last page of the installation process and by default is usually /opt/subversion/bin .
توجه
If a Subversion release older than v1.6 is used, some version control features might not work.
پیکربندی کنترل نسخه در اوپن تونز
Once the version control server is configured and the version control client is installed it's possible to configure OpenToonz in order to use the version control.
In OpenToonz the version control information is stored in the versioncontrol.xml file located in the OpenToonz stuff\config folder. By default the file has the following content:
<?xml version="1.0" encoding="UTF-8"?>
<Repositories>
    <!-- REMOVE ENTIRELY THIS LINE TO ENABLE SVN
<repository>
    <name>PutYourRepositoryName</name>
    <localPath>putYourWorkingCopyPath</localPath>
    <repoPath>putYourRepositoryPath</repoPath>
</repository>
REMOVE ENTIRELY THIS LINE TO ENABLE SVN -->
    <svnPath></svnPath>
</Repositories>
By editing the file with a text editor it's possible to set the information for the central repository and the working copy location.
Together with the configuration file, version control users must be defined by editing the permissions.xml file located in the OpenToonz stuff\config folder.
توجه
The versioncontrol.xml and permissions.xml file have to be well-formed, and so cannot contain an opening tag without its related closing tag, otherwise OpenToonz will not run. If you decide to edit the files, make a backup copy first in case you need to revert the file to the original version.
نکته
To configure the version control in OpenToonz:
Open the
versioncontrol.xmlfile located in theOpenToonz stuff\configfolder with a text editor.Delete the line
<!-- REMOVE ENTIRELY THIS LINE TO ENABLE SVNand the line
REMOVE ENTIRELY THIS LINE TO ENABLE SVN -->
In the line
<name>PutYourRepositoryName</name>type between the tags the name you want the repository to have in the OpenToonz browser.
In the line
<localPath>putYourWorkingCopyPath</localPath>type between the tags the path to where you want the working copy to be located on the local computer (e.g.
C:\myworkingcopy\for Windows or/myworkingcopyfor Macintosh).
In the line
<repoPath>putYourRepositoryPath</repoPath>type between the tags the URL of the central repository according to how it was defined on the version control server (e.g.
http://10.0.0.1/mySVNrepository/for a repository located in the local network;file:///C:/mySVNrepositoryfor a repository located in the local Windows computer orfile:///mySVNrepositoryfor a repository located in the local Macintosh computer; andhttps://subversion.assembla.com/svn/mySVNrepositoryfor an internet-based repository).For Macintosh only, if the OS is older than Snow Leopard and you installed the Subversion client 1.6 or later, in the line
<svnPath></svnPath>type between the tags the path to the folder where Subversion is installed (this information is displayed in the last page of the installation process and by default is
/opt/subversion/bin).
Save the
versioncontrol.xmlfile.
نکته
To define the version control users:
Open the
permissions.xmlfile located in theOpenToonz stuff\configfolder with a text editor.In the user section define a user and assign him the version control user name and password as configured on the server. For example to assign to the user JohnDoe the user johnd whose password is johndpassword, add the following user:
<user name="JohnDoe">
    <roles>toonzer</roles>
    <svn name="johnd" password="johndpassword" />
</user>
Save the
permissions.xmlfile.
نکته
To define several version control repositories:
Open the
versioncontrol.xmlfile located in theOpenToonz stuff\configfolder with a text editor.Add after the lines defining a repository the following lines:
<repository>
    <name>PutYourRepositoryName</name>
    <localPath>putYourWorkingCopyPath</localPath>
    <repoPath>putYourRepositoryPath</repoPath>
</repository>
and set the related information.
Save the
versioncontrol.xmlfile.
نکته
To define users for different repositories:
Open the
permissions.xmlfile located in theOpenToonz stuff\configfolder with a text editor.In the user section assign to a user the version control user name and password as configured on the server of the second repository. For example to assign to the user JohnDoe the user johnd2 whose password is johndpassword2 defined for the second repository, add a
svn nameline so that theuser namesection in thepermissions.xmlfile will look like the following:<user name="JohnDoe"> <roles>toonzer</roles> <svn name="johnd" password="johndpassword" /> <svn name="johnd2" password="johndpassword2" /> </user>
Save the
permissions.xmlfile.
Initializing the Version Control in OpenToonz
Before starting to use the version control system, it has to be initialized by setting an option in the Preferences dialog and restarting OpenToonz.
At this point the repository will be displayed in the OpenToonz browser, and you will be able to start using it.
نکته
To initialize the version control system:
In OpenToonz open the Preferences → Version Control dialog and activate the Enable Version Control option.
توجه
If the version control is not correctly installed or the configuration file is not correctly defined, activating the option will prompt a warning message.
Quit and restart OpenToonz.
In the OpenToonz browser look for the repository at the end of the folder tree, named as you defined it in the configuration file; right-click it and choose Get from the menu that opens to establish the connection between the central repository and the local working copy.
استفاده از سیستم کنترل نسخه
The central repository and the local working copy are displayed in the OpenToonz browser at the end of the folder tree as one single folder. By navigating the contents of this folder it's possible to retrieve the folders and files.
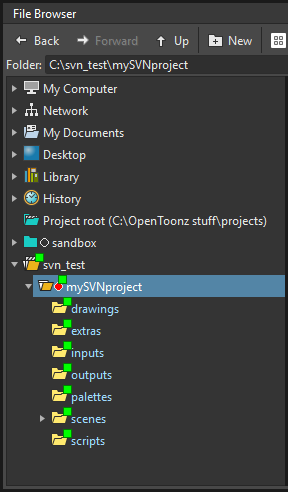
One online repository defined (svn_test) hosting the active project (mySVNproject).
When a folder is selected in the folder tree a refresh operation occurs automatically, to check the status of the folder and its content. As this operations may require some time according to the connection speed on the local network or in the Internet, the automatic refresh operation can be disabled.
توجه
If several repositories are defined, each of them will be displayed with the name previously assigned.
نکته
To disable the automatic refresh for folder content:
Choose File → Preferences → Version Control.
Deactivate the Automatically Refresh Folder Contents option.
نکته
To manually refresh a folder content visualization:
Right-click the folder icon in the folder tree and choose Refresh from the menu that opens.
Getting and Putting Folders and Files
The basic operations in the version control system involves getting files from the central repository to the local working copy; and then putting the modified files back from the local working copy to the central repository.
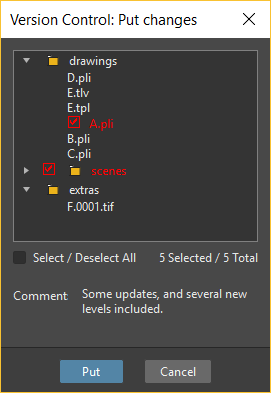
In case you are putting folders, in the dialog that opens you can check which files and folders contained in the selected folder have to be put in the central repository. Every time files and folders are put, it is also possible to type a comment to let the other users know about s of the performed modifications.
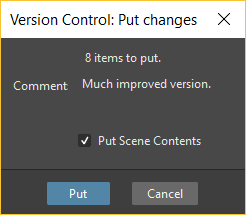
In case you are getting or putting scene files (TNZ format), in the dialog that opens it's possible to check the Get Scene Contents or the Put Scene Contents option to include with the request, or return back, the materials used in the scene as well.
توجه
The first time you get a folder not previously available in the working copy (folder with grey icon), you get the files contained in the folder, but not the sub-folders. The next time you get the folder (folder with a colored icon), you get the entire contents of the folder, including sub-folders and the related contents.
نکته
To get the latest version of a folder or a file from the central repository to the local working copy:
Right-click the folder icon in the folder tree, or the file icon in the browser, and choose Get from the menu that opens.
In the dialog that opens if you are getting a scene file (TNZ format) activate the Get Scene Contents if you want to get the files used in the scene as well.
Click the Update button.
نکته
To put your modified version of a folder or a file from the local working copy to the central repository:
Right-click the folder icon in the folder tree, or the file icon in the browser, and choose Put from the menu that opens.
In the dialog that opens do any of the following:
If you are putting a folder, check which files and folders contained by the selected folder have to be put in the central repository.
If you are putting a scene file (TNZ format) activate the Put Scene Contents if you want to put the files used in the scene as well.
Type a comment if required and click the Put button.
ویرایش فایل ها
When using the version control system, in order to modify files you have to put them in Edit mode before loading them into OpenToonz; if not, they will be loaded as read-only.
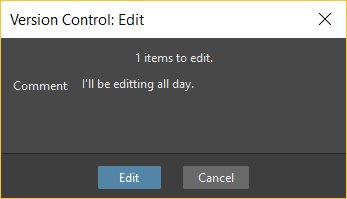
The Edit operation "locks" the file, so only the user running the command will be able to modify it (preventing other users using the same central repository from unlocking it and being able to modify it). At the moment a file is about to be edited, it's possible to type in a Comment, to let the other users know about your editing operation.
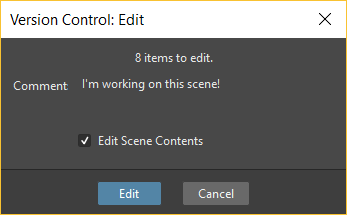
When editing a scene file (TNZ format), in the dialog that opens it's possible to check the Edit Scene Contents option, in order to be able to edit the materials used in the scene as well. If you choose to edit only the scene file, or if some material used in the scene is currently being edited by other users sharing the same central repository, the locked frames of that levels will be displayed with a forbidden icon in the Level Strip.
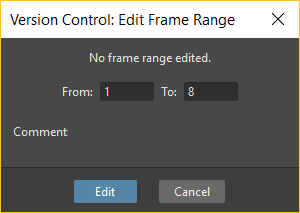
The Edit Frame Range command is available as well, to let a user edit only the needed frames of any Toonz Vector or Toonz Raster animation level. This way, different users can work at the same time on different frame ranges of the same animation level.
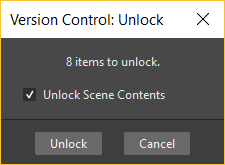
When you want to release files from the editing mode, so that others can work on them, you can use the Unlock command.
توجه
Files are in read-only mode (or in locked mode) in case a user is editing them, by setting the file system read-only attribute. For this reason, manually using the OS (instead of the appropriate version control commands) to change this status, may cause serious inconsistencies in the version control system.
نکته
To edit an updated file:
Right-click the file and choose Edit from the menu that opens.
In the dialog that opens if you are editing a scene file (TNZ format) activate the Edit Scene Contents if you want to edit the files used in the scene as well.
Type a comment if required and click the Edit button.
نکته
To edit a file that is older than the version available in the central repository:
Right-click the file and choose Edit from the menu that opens.
In the dialog that opens if you are editing a scene file (TNZ format) activate the Edit Scene Contents if you want to edit the files used in the scene as well.
Type a comment if required and do one of the following:
Click the Get and Edit button to get the latest version of the files and edit them.
Click the Edit button to edit the version of the files that is currently in your local working copy.
نکته
To edit only the needed frames of a Toonz level file:
Right-click the file and choose Edit Frame Range from the menu that opens.
In the dialog that opens set the frame range you want to edit.
Type a comment if required and click the Edit button.
نکته
To release a file from the editing mode:
Right-click the file and choose Unlock from the menu that opens.
نکته
To check the editing state of a locked file:
Right-click the file and choose Edit Info from the menu that opens.
Retrieving File Revisions
One of the main advantages of using a version control system is that the history of the revisions for every file in the production database is always available. This means that it's possible to very easily retrieve previous versions of any file.
To retrieve older file versions it's possible to use the Get Revision command. When used on a single file it displays a timeline with all the file versions; in the timeline you can check the different file versions with the related icons and information, and select which version to get in order to edit it.
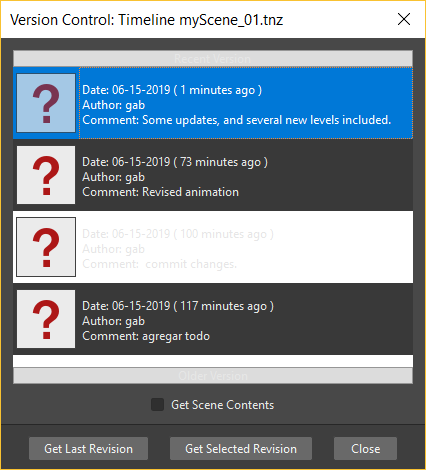
When getting a revision of a scene file (TNZ format), in the dialog that opens it's possible to check the Get Scene Contents option in order to get the revisions of the materials used in the scene as well.
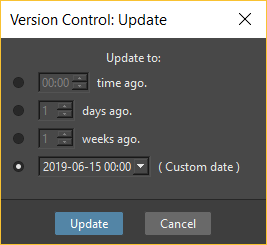
When used on a multiple files selection it opens a dialog that allows you to specify the time, day, week or date of the files version you want to retrieve.
نکته
To retrieve an older revision of a file:
Right-click the file and choose Get Revision from the menu that opens.
In the dialog that opens look for the file version you are interested in and select it; if you are editing a scene file (TNZ format) activate the Edit Scene Contents if you want to get the revision of the files used in the scene as well.
Do one of the following:
Click the Get Selected Revision button to get the selected file version.
Click the Get Last Revision button to get the latest file version.
نکته
To retrieve an older revision of a selection of multiple files:
Right-click any of the selected files and choose Get Revision from the menu that opens.
In the dialog that opens specify how much older the version of the files you want to retrieve has to be, by doing one of the following:
Specify a time in hours and minutes.
Specify a number of days.
Specify a number of weeks.
Specify and exact date and time.
Click the Update button.
Understanding the Folder and File Icons
According to the folder and file icons you can tell if the folder or the file in the working copy is updated or not to the latest version available in the central repository, and if files are edited by other users and locked.
توجه
If the File Browser displays files as a List, the information about the version control status is displayed in the column labeled Version Control.
For folders the following icons are used:
 A grey folder icon is used for folders available only in the repository. You can use the Get command to copy them to the local working copy.
 A colored folder icon with a yellow mark is used when the folder contents in the working copy is not up to date and does not match to the folder contents in the repository: this is the case when there are modified or new files in the working copy or there are modified or new files in the repository. You can use the Get command to copy them to the local working copy.
 A colored folder icon with a green mark is used when the folder contents in the working copy is up to date and matches to the folder contents in the repository.
 A colored folder with a plus mark is used for folders available only in the working copy. You can use the Put command to copy them to the central repository.
For files the following icons are used:
A generic grey icon is used for files available only in the repository. You can use the Get command to copy them to the local working copy.
 The file icon with a grey check mark is used when files in the working copy are up to date and match to the latest version available in the repository. The files are in read-only mode, and they have to be in edit mode in order to be modified.
 The file icon with a green check mark is used when files in the working copy are in edit mode.
 The file icon with a green check mark on a grey and white background is used when files in the working copy are partially in edit mode.
 The file icon with a red exclamation mark is used when files in the working copy are newer than the latest version available in the repository, because you modified them. You can use the Put command to copy them to the central repository.
 The file icon with a red exclamation mark on a grey and white background is used when files in the working copy are partially newer than to the latest version available in the repository, because you modified them. You can use the Put command to copy them to the central repository.
 The file icon with an orange exclamation mark is used when files in the working copy are older than the latest version available in the repository, because someone modified them. You can use the Get command to copy them to the local working copy.
 The file icon with an lock mark is used when files are in edit mode by other users. For these files it is only possible to check the information about the user editing the file.
 The file icon with a lock mark on a grey and white background is used when files are partially in edit mode by other users.
 The file icon with the plus mark is used for files available only in the working copy. You can use the Put command to copy them to the central repository.